New Year, New Home Resolutions

While you’re likely busy preparing for holiday celebrations, festive entertaining, and winter travel, this is also the perfect time to take a closer look at your home and plan for the repairs, maintenance, and redesign projects that need to be tackled in the coming year.

We don’t know a better way to celebrate the fresh possibilities of a new year than to breathe new life into a space that you use every day. Instant quality-of-life improvement!

We’re grateful for the trust our clients place in us, and we make it our goal to exceed their expectations for reimagining the spaces they share with family and friends all year through.

Call us today to discuss your needs. We’ll be happy to create a 2019 plan for your home.

Behind the Scenes: What Our Customers Never See

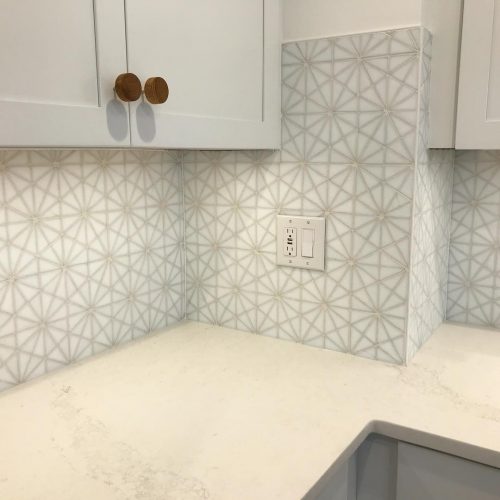
Being a design build general contractor working any given day on a variety of projects throughout the Delaware Valley means that there’s never a dull moment around here. Each day brings new challenges and opportunities to find creative solutions — and that’s one of the things we love about this business!

At Myers Constructs, our clients’ projects receive the attention of both company owners: Tamara and me. At the outset, most of our clients understand that we will design their projects and also manage the construction, as well as the complex processes that are involved. What they don’t know is that when the need arises, Tamara and I go to the job site to personally handle some portion of a project ourselves to ensure great quality control for clients. In fact, there are important things we do on a daily basis that most clients never see. For example, Tamara could recently be found personally installing knobs and pulls in a kitchen and overseeing the project’s demanding tile installation. A month earlier, I was handling the framing and cabinet installation for the same kitchen because it was a tricky execution in a very small space, and our staff was fully scheduled during the peak of our busiest season.

Likewise, it’s not uncommon for either Tamara or I to have to run to a supplier to get a small item that arrives after a backorder and needs to be on site right away just to keep a job on schedule. Case in point: We recently personally rushed to Ambler to pick up a light fixture we needed to install in a Center City project. On yet another project, there was a 600-lb load of tile for two bathrooms in the back of my SUV that I unloaded myself.

We take a lot of personal pride in the results that come from this kind of attention to detail — and the happy reaction from customers when their projects are completed on time, on budget, and exceed their expectations. As the saying goes, “When you do what you love, you never work a day in your life.”

In the Works: Glenside Colonial Goes Art Deco

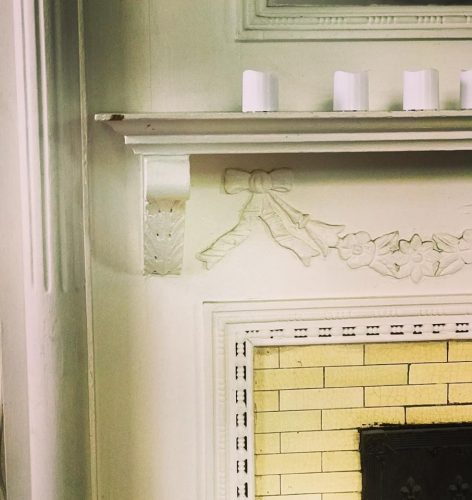
One of our clients recently purchased this lovely large brick Colonial in the quaint and eclectic Philadelphia suburb of Glenside. His goal is to restore the home in a way that showcases his love for Art Deco styling, decor, and an extensive collection of art, ceramics, radios, and other electronics.

The home was built by a local developer in the 1920s, and it represents the best quality workmanship of its era — in fact, even the laundry room floor has the original aqua blue linoleum floor still in very good condition! However, the challenge presented by this home is that some of its previous owners made adjustments over the years that didn’t fit its style. For example, the large pantry and back hall, where you might carry in groceries from the rear parking area, was converted into a wine bar featuring faux stucco and brick accents applied to the plaster walls. The modest-sized kitchen had a dated pickled pink cabinet stain and a sandy-colored commercial tile floor. Throughout much of the house, wall-to-wall carpeting covered beautiful original fir and oak floors, and almost every room had heavy drapes keeping out the beautiful light coming through large multi-paned windows. Finally, updated bathrooms had vanities, tile, and accessories that didn’t mesh well with the home’s look and feel.

Our client, who has a very strong sense of aesthetics, called us in to restore the house to its 1920s style and include some of his preferred Art Deco finishes and selections, as well. In addition to helping him redesign a new kitchen to fit the house, we are helping him tease through what else needs to be changed and make a plan for updating the bathrooms, restoring the hardwood floors, installing new lighting and hardware, selecting new wall finishes, and even choosing window treatments and placing furniture — the “soft stuff,” as we call it in the business. Keeping the focus on his personal style preferences, we’ll also create solutions for displaying his collections.

We love projects like this whole house update that draw not only on our expertise in design build systems, but also on our unique understanding of art and style history.

Holistic Renovation: A Look at the Whole-House Tune Up

When it comes to renovating a home, our solutions are truly always greater when we look at the sum of the individual parts. It allows us and the clients to understand how they will work together over time in the context of an overall home design system. In an ideal scenario, any project we undertake involves looking at big-picture problem solving in a very holistic way. Depending on the project budget and the clients’ vision and needs, we can break projects up into logical sections so we can plan for future needs in the spaces we finish first. We are, in fact, doing this for several customers now. Here are a few examples:

  • A retired client recently purchased a beautiful, large brick Center Hall Colonial in Glenside that needs stylistic upgrades that match his preference for 1930s Art Deco-era styling. The first steps include removing carpets to expose the hardwood floors, updating bathrooms to period-correct fixtures and finishes, replacing some knob and tube wiring, and painting. Plans are in the works for a new kitchen.
  • An engaged couple purchased a newer rowhome in Philadelphia’s Bella Vista neighborhood. While the home was built in the 1980s and well maintained, it was never well planned, so lots of potential in terms of space and features were missed. We’re helping them develop the full potential of their house. For example, their basement level was not well laid out and ended up serving as a large mechanical room with no storage at all. With some good planning and problem-solving from Tamara, we were able to convert the space to include a new laundry room, a mechanical room, and two generously sized closets plus a media/TV room.
  • In addition, their existing modest eat-in kitchen needed some rethinking. The layout, function, and finishes were builder grade, and the kitchen soffit areas housed the HVAC ducting, so we could not change those. We redesigned the layout to include an island that will include a microwave drawer and seating for a new eat-in area, as well as better finishes for the counters and backsplashes. The clients chose a “tuxedo” color scheme of white cabinets on the walls and bases, and a pretty dark blue color on the island cabinets. The floor is a beautiful limed oak flooring that looks great with the color scheme selected. Future plans may include developing the interior master areas on the top floors of the home.
  • We just finished a smaller scale tune up in South Philly on a 2-story, 2-bed/1-bath rental house that was inefficiently renovated over many years. We gave the owners a new, level and sturdy bathroom (the old bathroom was 3” out of level!), new master bedroom closet, new drywall walls and ceilings, updated electrical work, and refinished existing flooring. They plan to continue renting the house as a family wealth-building asset, so the improvements we made will allow them to raise the rental fee, which will pay off for decades to come. Future projects in this home include a potential kitchen renovation and combined dining-living room space.
  • A repeat client of two decades called us to redesign her master bathroom. It’s a long, narrow room with an oversized dark wood vanity, dark blue walk-in shower, outdated tile bathroom floor, and a toilet stall. All of this makes for a tight, uncomfortable space that lacks natural light. We finished tuning up many other major spaces and elements of her Chestnut Hill home last year, so we are happy to return to execute new solutions for this troublesome master bath that mesh well with the ongoing renovations in the home.

Stay tuned to our website and social media for updates on all of these projects and more!

The Myers Constructs Team

Why Project Management Is Not a DIY Job

Substantial home renovation projects come with equally substantial price tags — think new kitchens and bathrooms, updated energy and heating systems, whole home renovations, and the like. These are complex undertakings that involve big-ticket components and cut across many disciplines, including local permitting agencies, the EPA, engineers, a long list of contractors, vendors, suppliers, and specialists. Important details need to be coordinated, planned, and managed. Risks need to be anticipated and avoided. When problems arise, quick solutions need to be found so the project keeps moving along, avoiding time and cost overages.

So who is the right person to manage the details for a project of this scale? In some cases, contractors allow the carpenter or whichever sub is on site on any given day to try to manage your project between their daily tasks. In other cases, the homeowners attempt to handle the job themselves. In our opinion — based on decades of experience — project management needs to be handled by a dedicated project manager (PM) who has experience matching the type and scale of your project. As we’ve seen time and time again, a PM with little or no experience leads to frustration, headaches, or even project failure. Even those who might be experienced with new construction, commercial construction, or tract house construction are not suited to manage a residential renovation for an older home. These are all totally different disciplines with different project goals, complexity, design standards, and quality levels.

A professional and competent PM will handle all of the following vital jobs, and more:

  • Use proven processes and systems to create a tactical plan and construction schedule for building what is in your design drawings.
  • Ensure the subs are on site according to those plans, barring unforeseen events like weather, late decision-making, project scope changes, or illness.
  • Utilize intuition, experience, and knowledge to identify potential risks, pitfalls, and common issues that arise and get them fixed before they become big, costly problems. Generally speaking, the higher the price tag, the more complex the list of products and materials to be managed — and a mis-ordered or damaged item can take 6-12 weeks to replace!
  • Keep employees, subs, and even clients motivated.
  • Set the tone for the work site and direct everyone regarding safety, cleanliness, and orderliness.
  • Approve pay for subs when the work is correct, complete, and inspected (if required).
  • Keep stakeholders updated on progress, problems, and changes.
  • Proactively manage the many risks of a project so clients don’t have to.

When done properly, professional project management goes unnoticed by the homeowner because the project runs smoothly, stress levels are low, and everything feels easy. It’s when project management is absent or mishandled that it becomes a very obvious and vexing problem. Investing your money well in the services of a seasoned pro will pay dividends both now and throughout the life of your beautifully finished project.

Renovation Procrastination: Getting Ready to Be Ready to Begin

I sometimes tease when someone I know is obviously procrastinating. I say they are “getting ready to be ready to begin.” But teasing aside, many of us can use a little help getting started from time to time, especially when it comes to planning a big remodeling project.

We all know a big renovation will be painful in many ways: cost, time, displacement, noise, disruption, commitment, change, anxiety, and dust all come to mind. I know because I have renovated my own house, and I have felt the same pain my clients have felt. I too have put off making necessary improvements because I wanted to avoid the pains of renovating. What helps to minimize these inconveniences is to actually begin the “getting ready to be ready” part. The following is a list of some things you might do to begin your own “get ready to be ready” to renovate process. And you can feel better knowing that since you are reading this, you are one step closer to BEING ready!

1. Put Your Thoughts on Paper — Write a simple description of the look, feel, and type of renovation you’re hoping to achieve. Divide your list into “wishes” and “must haves.” This helps you organize your goals for the project, and tells us a tremendous amount of important information as we begin designing your solutions.

2. Get on the Same Page With Your Partner — Quite simply, we don’t want to be the arbitrator of conflicts related to your renovation. Make sure you both agree on all major choices ahead of time.

3. Get Packing — Clearing out the space to be renovated is one of the biggest hurdles some folks have. None of us believes we have a lot of stuff until we have to deal with packing it up. You can never start too soon — even before calling us.

4. Manage the Money — Let’s not sugarcoat it: Spending money is an emotional decision. Some remodelers call it “investing,” which is an attempt at making a spend feel like it doesn’t hurt. Yes, you are investing in your family’s quality of life, and yes, your house will gain some measure of value and hopefully be easier to sell down the road. But you have to spend money to make it happen. Establish a reasonable budget and determine how you will pay for the renovation. Are you going to do a HELOC? Use some savings, a bonus, or a dividend? Did your Aunt Sue leave you a large inheritance? You may want to talk to your accountant about how to get your money ready, or the bank or relative who is going to be giving it to you. It often helps to start this process early to take advantage of tax or interest benefits.

5. Manage Your Stress — Is your dog or cat the type who will escape if the door is open? If so, you will want to arrange for pet day care or get him/her crate trained. Most pets hate the sound of construction and constant intruders into their domain, and they will act out with destructive behavior, urinating in the house or worse. And while we can’t blame these animals who are only trying to protect their territory and families, we do need them out of the way so we can be productive and safe while we work in your home. The humans in the house will also be stressed out. Consider booking a vacation or some spa time during the worst parts.

6. Take a Leap of Faith — A big renovation will demand a big investment of your precious time, money, commitment, and attention. Once the design is completed, you will have the necessary trust in both the design and us to move into construction.

7. Move out — If you can, and in some cases you really must, move into temporary housing. This takes time. Explore your options early so you can make the move before construction begins.

The time you spend managing these steps will help you feel ready to get to work with us, even if you’re still a little nervous about the process. It’s OK. We understand because we do this all the time — and we can help every step of the way.


Image: Nicolas Huk

What I Learned on My Summer Vacation Across the Pond

This week, I ran across a wonderful Remodelista article featuring an older Danish home restoration that included a stunning thatched roof. It caught my eye because I had just returned from vacationing in Denmark and was lucky enough to spot a few beautiful thatched roofs in my travels there.

There’s nothing like being in a country that is centuries older than ours to notice the choices that are made for older buildings. Denmark has a culture that values building materials that are sustainable and long lasting, and most of the roofs I saw on both old and new homes were in it for the long haul.

Thatched roofs, when maintained, typically have a lifespan of about 70 years — far exceeding the better go-to roofing materials found in the United States. More common and equally as striking home roofing material is the Spanish or barrel tiles, which have a typical life of around 50 years. Usually the flashings fail first, so the tiles can be removed, the flashing and related materials renewed, and then the tile re-installed. These half-circle overlapping tiles create a beautiful textual pattern and work quite well in protecting the building from water. Traditionally, these were made from local materials, often terra cotta, which is why you will see different color roofs in different countries and regions. These days, there are long-life composite versions that include concrete and plastic. And looking to the next generation, Tesla team is bringing to market a new long-life solar roof tile that will include a warranty of the life of the home.

The practice of using sustainable materials is centuries old, and it’s great to visit other countries and cultures to be reminded of the beauty of older buildings and that building well from the beginning will serve the occupants well. Choosing materials and methods to last for generations is the norm — a philosophy that resonates with our company and our clients.

The “Spend Once” Approach: Quality Condo Solutions That Last

Over the years, we’ve worked on many Philadelphia condos in older historic buildings — and we find that many of our clients are drawn to them because they offer nice city views and simple spaces to live in. There isn’t any yard work, and the overall building is taken care of by a building manager.

However, over the years, we’ve seen many developers that have created these units as cheaply as possible to maximize their profits. The buildings often once served as apartments or offices that were then renovated into living spaces, and they typically have some great architectural elements that were original to the building, including molding, big windows, patios, views, steel beams, concrete, beautiful wood floors, and more. But when the buildings were converted, many builder-grade solutions were used, like pre-finished cheap flooring, inexpensive tile, common low-end counters, cabinets and doors, the cheapest lighting possible. None of these things has much character, and they don’t convey the owner’s personality or sense of style or taste. Each unit looks just like the other, and they end up feeling like mid-range hotel rooms. After a short time, the products and finishes look out of date, worn, or worse.

When we approach these renovations, our motto is “spend once.” In other words, when clients are willing to invest in a well planned and executed space, they will enjoy great style that lasts a long time, wears well, and can be used for decades to come with an occasional simple refresh to the paint, perhaps a new article of furniture, pillows, or artwork.

Quality solutions like these come from listening to clients during our meetings, from designing great spaces, and from selecting great quality products and finishes. While projects like these aren’t for everyone, we love them and look forward to meeting new clients who feel the same.

Condo Reno: Meeting the Unique Challenges of City Projects

Condo Renovation - Unique ChallengesWe just started a new project for a repeat client, for whom we previously renovated a kitchen, dining room, and added a finished family room with full bath in the basement in a lovely 1860s Victorian rowhome on St. James Place in Philadelphia. While that location — like most city projects — presented some logistics and access challenges, we were able to work around them by parking on the street to unload equipment and materials and then moving to paid parking for the duration of the day. Because we have spent decades working on city projects, issues like these are all in a day’s work for us.

The clients’ new project home is a lovely modern Art Museum penthouse condominium featuring a stunning array of windows with spectacular views of the city. We are eager to dig our hands into this comprehensive whole-home renovation, but it does require some additional considerations in terms of planning and execution.

Clearances — We met and worked with the management team, the dock manager, and the building’s physical plant manager to gain clearances, review plans and schedules, and get the green light to begin work.

Protection — During demo, we protect the carpet in the public hallway, covering the path from the unit to the service elevator with a special plastic that protects from dirt and damage. This plastic must go down every morning and come up every afternoon — a process that takes about an hour within the allotted work hours of 8 am-4:30 pm.

Sub Considerations — The demo phase requires our electricians and plumbers to disconnect various system elements. Plumbing is especially important since any pipe broken during demolition could flood the many floors below us. Being an older building, the plumbing system requires us to shut off a whole section of the building to work on our condo’s pipes, and this is restricted to limited time periods during the day. Planning and permissions for these temporary water shut downs are quite involved and can take 2-4 weeks to execute.

Elevator Usage — In order to begin demolition, we had to secure time on the service elevator in advance, with residents moving in or out of the building getting first dibs ahead of us. The service elevators in this building are larger than some, but are small by construction materials standards at 4x5x10’. As is common in many older buildings, the elevators can go down temporarily or even stop for the day, in which case we have to use the elevator on the other side of the building and travel through more hallways.

All of this goes to say that we have to be even more organized and do more preparation than we typically do for our other city projects. The good news is it’s already paying off in how well the job site is set up for the demolition crew, as well as how neatly the debris is staged for removal. Our work space looks tidy while we wait for the elevators to become available again, then continue to remove these items to a dumpster waiting at the loading dock.

Stay tuned for photos as we make headway on this challenging project!

In the Works: Center City Trinity Gets Underway

img_4446
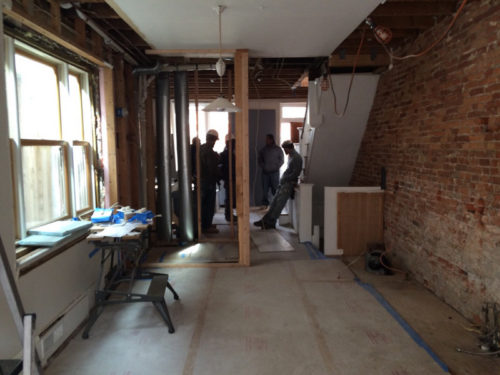
This week, we are in the framing and rough-in phases for our Center City trinity project. Because of this home’s small, tight spaces, we are approaching the renovations a bit differently than we normally do. Typically, we like to fully complete framing before asking our subcontractors to come in to work in a particular order. However, because of the complexity of the spaces being fitted on this project, the carpenter will do some of the framing, then the plumber and electrician must fit some elements, and then the carpenter has to do more framing before the other two come back through to do yet more rough-in work. The same process will go for the HVAC work.

The image shown here illustrates some of the original character-filled waves, sags, and bumps of this historic house. Some of these will remain, while others have to be squared up and made flat, mostly due to the mechanicals and finishes that will be installed later. This customized approach is very unique to how Myers Constructs works, and, in part, it’s what makes our projects look different from the work of other remodelers — and especially different from new construction. Our projects never consist of giant drywall “boxes” inserted into old houses. We always follow the rules of proportion already in place in every old house, and we work to enhance the existing character wherever possible. We believe this approach results in making both impactful design statements and happy homeowners.