New Homeowners: Thinking About Renovating? Don’t Miss These 6 Vital Tips

painterAs design-build general contractors, we get a lot of calls from folks who are either house shopping or have recently closed on a “new-to-them” older home that needs renovating. Most of them are new to the process and do not know the order of things that will happen during the home-buying/renovation process. Below is the ideal sequence of events, from our perspective after many decades in the business.

Before You Buy…

Practice Patience — Try to stay clear-eyed during the home shopping process. Most people are very excited about finding the “home of their dreams” or they want to tackle all of the renovations the old house needs at once, especially the “eye candy.” The truth is, most of the time, it’s better to wait, live with the new space, and see what really needs changing in order to live well in it.

Schedule Home Inspections — Be sure you have any prospective home inspected by a certified home inspector and pest pro, as well as any other suggested inspectors specified in your Agreement of Sale. Your real estate agent will help you set this up these appointments to identify items that must be corrected or repaired and the associated costs. The costliest fixes are systems like wiring, HV/AC, roofing, siding, windows, and plumbing. Do not scrimp on your home inspection because it generates a legal document you can go back to the sellers with during price negotiations and even after the sale, should serious problems with the house arise after you own it.

Set Up a General Contractor Site Visit — A good GC will bill you to do an initial site visit in order to help you decide whether or not you want to buy a particular house. Those visits typically deal with issues the home inspector finds, in addition to the projects on your wish list. A reputable GC will also be very familiar with the housing stock in the area where they work. With many of these calls we get into our office, we can give the caller pretty solid information about costs over the phone because we know the local houses so well.

After You Buy…

Schedule the Necessary Early Jobs — You will need to own the property before you are able to hire a GC to do any work on it. Most of the time, a seller will not even agree to allow you multiple planning visits to the house before they move out because they are busy with the moving process.

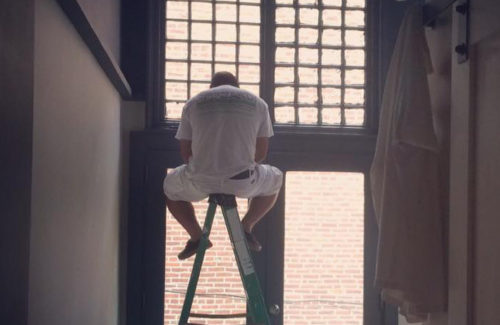
Find Temporary Living Space and Storage, If Required — Some of your desired projects may need to take place before you actually move in. Whether it’s a whole house makeover, such as our current pied-à-terre project, or cosmetic stuff like paint, floor refinishing, window replacement, rewiring, or addressing other issues uncovered by the home inspection. If your GC says you should wait to move in, it’s because that’s what is required — either by OSHA, the EPA, or the GC who needs the whole house space to do the job you hired them to do. As a result, you may need to arrange to stay in your prior residence or a temporary rental, and your belongings may need to be stored elsewhere for the duration of the project.

Enjoy Your New Space — Buying a house in need of construction and repairs can make for a long and sometimes stressful period. Once the “must have” projects are complete and you are cleared to move in, kick back and congratulate yourself and your team for making it all happen.

diane.sig

Sneak Peek: Center City Pied-à-Terre Project in Pictures

Here, we share just a few images of the exciting progress being made on our Lombard Street project.

kitch.base.cab.run_

The Myers Made™ custom cabinetry delivery is in place, ready for installation. These are custom cabinets sized to fit this small house to a “T.”

prep.for.wall.run_

Our design team and the clients wanted to make the most of the exposed brick in the kitchen. Instead of hiding this wall with cabinets and drywall, the team came up with a clever method for hanging a custom honed granite backsplash and shelf on this cooker wall. The custom black iron brackets will be hidden behind and below the black honed stone once it’s installed.

IMG_25381

A pretty and updated Eastern mosaic tile in the master bath. The vanity is wall mounted, so it feels lighter in the small room than a standard model that sits on the floor. You can see the vanity goes from one wall to the other but doesn’t interrupt the window. That good design gives the room a nice, well fitted feeling. We will use a trough sink with two faucets and two drains to get the same function as two sinks, which would have required much more space.

tiles_

This is a shot of the custom mosaic tile for the first-floor powder room wall. Each color was placed on this sheet of plywood so the “random” pattern could be installed. I joke about how much planning random patterns actually require. Inevitably, handmade random tiles illicit nervous reactions from clients who choose them. Clients often worry that the result will look different than they imagined, or that the handmade quality will be too evident or might need to be adjusted to be “more random,” but they end up loving the final result.

Stay tuned for progress reports on this project.

Water Damage Woes & A Pro Tip On How to Avoid Them

6837225281_801d1bc751_b

I got a call this week from a man whose home was flooded by a pipe that burst while he was away on a family trip. The water totally destroyed the first-floor finished flooring, as well as the walls in the kitchen, paneling in the halls, and all of the partition walls and ceilings in the basement. I have a feeling we may also have to add HVAC and electrical damage to the list. Once water gets into electrical fixtures, they need to be replaced.

The culprit in this case was the water line to a first-floor powder room toilet. That’s only a 3/8-inch pipe, but it caused hundreds of gallons of water to pump through the first floor into the basement and probably out the basement walls as the system continually kept flowing to refill itself.

This is the second call like this I have taken recently. In the other case, the homeowner was out of town at her winter home in Florida, and the cat sitter came in to a flooded house. The culprit there was a fairly new 1/2-inch line from the sink to the faucet in a second-floor bathroom. While the upper floor suffered some minor damage, the water completely gutted the lower levels, including the basement, the mechanicals, and the personal belongings they had stored there.

In both cases, the homeowners had to go through the misery of dealing with their insurance company to get the damages paid for.

As we head into prime vacation season, here is a simple tip from my plumber: shut off the water main before you leave the house if you’ll be away for an extended period of time. Even if a pipe bursts, you will minimize the impact and only suffer damage from the water that is in the line until it drains out. I do this now every time I leave home for a trip.

While I’ll get fewer calls for restoration projects sharing this advice, I’ll feel good knowing I was able to help prevent the problem in the first place.

diane.sig


Image: prana@neoprana.net

Adding a Shed: The New “It” Project

Saltbox Shed and Chicken RunBuilding a shed at our home has been on our “Honey Do List” for some time now, so we were happy when we were able to find some time last week to tackle this project.

Sheds are all the rage right now, it seems. We’re seeing them used as micro offices, creative studio spaces, children’s play rooms, adult meditation areas, pool cabanas, and teen hangouts. Personally, I love the idea of a small, quiet space to remove myself to — a place where I can reflect and ponder a bit. But the purpose of our shed is to store gardening supplies and house our flock of hens. We wanted to make space in our garage, so moving the garden tools and supplies out to a shed was a good first step. And while the hens were comfortable and warm in their existing small hen house, its small size made it hard for us to get in to collect eggs and clean.

This shed will have a human-sized door and hen space we can walk into, and we’ve built them a new run that is also tall enough for us to stand in. (L-to-R) Pumpkin, Electra, and Blackie 
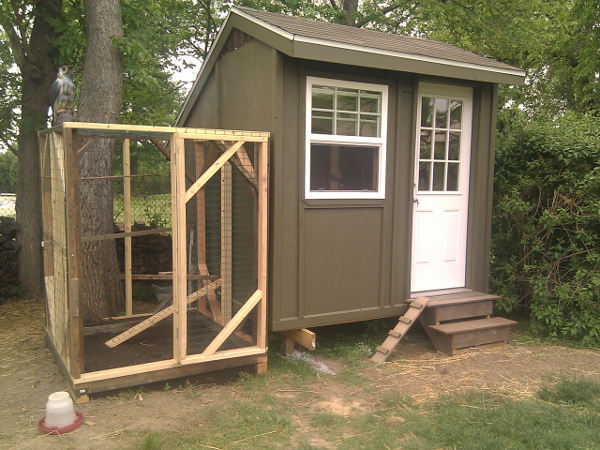
It’s a saltbox-style building measuring 8′ x 8′ with an 8’ tall ridge beam and long, sloping roofline that was designed to face the main source of the wind. The framing is standard 2×4, and the siding is CDX plywood with some ripped #2 pine for trim and batons. The door and windows are stock items from the home center. Because this shed is so small and unfinished, we opted for piers instead of a cement foundation.

Sheds are a nice way to add useable space to your property, and they can be as finished or simple, and as serious or playful as you like, depending on your needs. Call us for more details on completing a shed project for your own home.

Diane Menke, VP/Operations Manager
Myers Constructs Inc.

In Praise of Multi-Purpose Spaces

cafe.areaWe find that most of our clients lead busy lives, wearing many hats and juggling multiple tasks daily — and they need their homes to fit that lifestyle. For that reason, we like to think about spaces creatively to imagine how they can serve multiple purposes.

Case in point: When we remodeled our own kitchen, we created a little “cafe area” that sits off to the side. In this space, we eat lots of meals, relax with a glass of wine, and sometimes catch up on bills and correspondence. We find that it’s a nice place to pause during the day or relax together while cooking dinner at night. It could also easily work as a game area, arts and crafts space, or small office-on-the-go.

It’s hard to imagine, but this cafe area was once the original entryway to our house. It consisted of a 4’x16′ broken concrete pad along the front center of the home that led to a front door with a side light and a small entryway closet. Next to this were some tiny windows and a doorway to the kitchen. The front door didn’t function anymore because the slope of the broken pad caused the door to be pinched. Instead, everyone used what was the breezeway between the house and the garage to enter the home. We decided to make this the true entryway, finishing the breezeway off as a foyer/mudroom. We removed the old front wall, door, windows, hall closet, and kitchen walls to create an open plan kitchen and family room. In the process, we added about 50 square feet of floor space. That doesn’t sound like much, but it had a huge effect on the space of the kitchen and the entire first floor.

To keep the cafe area from feeling cramped, we were careful to select light-feeling furnishings, including two art deco chrome chairs we had recovered in white leather and a small, marble-topped Saarinen table. The side tables/benches are storage boxes I built many years ago with a simple combed painted finish, which do double-duty as additional seating. We finished the area simply with a painting I created in the 1990s, and clean-lined roller shades.

Diane Menke
Diane Menke, VP/Operations Manager

How Much Will My New Kitchen Cost?

(Part 1 in a series that examines our customers’ most frequently asked questions.)

New clients often call us wanting to know what a new kitchen will cost them. The simple answer? Until we visit their home and find out what they want us to spec out for the project, we don’t know what the exact price will be. But we can provide some general pricing information. Kitchen remodels can run from $15,000 to well over $200,000. However, most of our kitchen customers spend between $45,000 and $90,000 for a soup-to-nuts, gut-to-the-studs-and joists total refit to their kitchen.

Let’s take a look at what one of our kitchens in this average price range looks like. This is what we mean when we say “gutted”:

IMG_6429_540x655_

In this case, we didn’t take the floor down to the joists, but that happens on many projects in older houses. We gut a room like this because the system of mechanicals, structure, and vapor control behind the walls does not meet code requirements or is not performing adequately. We need to open everything up to bring it to modern performance standards and code. For this project, we also had to jack up the small bay the kitchen sink sits in, and install a replacement beam for the one you see in this picture. Over time, the bay had drooped more than two inches because the builder used undersized structural components.

We installed all new wiring, lighting, plumbing, insulation, drywall, and ceilings. After that came some very nice quality modern cabinets, stone, backsplash, and appliances. A few more nice touches, and it looked like this:

stove.view_540_

Most clients then ask “Why is there such a big price range?” and “What do I get for my money?” If you have $15,000 to spend, chances are you are going to be doing the job yourself or working with an unlicensed, uninsured carpenter charging a nominal hourly rate. This will be a simple room re-fit that includes the following:

  • No new plumbing, electrical, or structural work
  • Self-management of the project, including selection and ordering the products
  • Reuse of existing appliances or purchasing inexpensive replacements
  • Simple, inexpensive lighting solutions
  • Low-quality cabinetry and countertops
  • DIY painting of the finished room.

If you are spending $45,000 to $200,000 or more, your project will likely have a scope that includes:

  • A design-to-build general contractor to manage all facets of your remodel
  • Gutting the room to the studs to run new electric, plumbing, and heat
  • High-end appliance packages, such as Miele, Wolf, Sub-Zero, Thermador
  • Custom or high-end cabinets
  • Granite, soapstone, or similar countertops
  • High-end tile backsplash
  • New floors
  • A complete lighting plan that includes ceiling, task, and under-cabinet lighting
  • Possibly structural changes to open the kitchen to another room in the house
  • Possibly inclusion of a new adjacent mudroom, laundry, or powder room.

Over the past year, we have seen many customers seeking alternatives to this comprehensive kitchen package approach. Some want to have their own subcontractors handle some sections of the work. Some want to specify and buy their own countertops or appliances. We handle these requests on a case-by-case basis, but generally speaking, we are happy to work with clients who want to handle some tasks on their own, as long as those changes do not alter the scope or schedule of the project.

Have additional remodeling questions you need answered? Please don’t hesitate to ask.

Personalized Renovation: Your Home Should Tell Your Story

130222_fossils_When we work with homeowners during the design phase of a home improvement project, we ask about them about how they live their lives and how they use their rooms. We inquire about their hobbies and the attributes of a home that are really important to them, and we actively listen to their answers. We do this because we want their homes to tell a special story about their lives, interests, and personalities. We then help them prioritize their product and design decisions based on what they have told us. This is, after all, the project they’ve saved for and dreamed about for years. The right choices to tell a homeowner’s story never lie in builder-grade solutions or cookie-cutter renovations that look just like their neighbors’ homes.

The photo on the left shows a recent kitchen renovation we did for a couple in Center City Philadelphia. In our initial discussions for this project, we learned that the homeowners’ old kitchen was built by a handy non-pro in the 1970s, and it was in very poor shape with some rusty appliances being held together with duct tape. But the couple delayed doing the work until they found someone whom they could trust to listen to their needs.

This three-story, 19th century brick home is located on a small alley-sized street, very typical of old cities on the East Coast. It may have been a tenement or a small factory in its early years. Our assignment was to design a kitchen that fit into the old building without changing its window openings, while incorporating the use of a shared rear patio. We were also asked to add a small powder room off of the kitchen.

Through our talks, we learned that these homeowners entertain large groups of friends, so we knew that the living room, dining room, and kitchen had to flow together smoothly. We also discovered that these homeowners are very active cooks, so their kitchen needed to be more than just a showplace; it had to be an actual workshop for cooking. Their interests also include music, Inuit-carved stone sculptures, and science — so we decided to incorporate some of their beautiful, treasured fossils into the kitchen backsplash. We absolutely love weaving personal objects like these into our renovation projects. Talk about telling a story!

As we considered the options for finishes, we found that the couple’s tastes lean toward combinations of natural materials, like wood floors, slate countertops and floors, limestone, stainless steel, and cherry cabinetry. To complement these choices, we took every opportunity to let light in, with the broadest stroke being a large sliding-glass door leading to their patio and a small seating area situated under a statue of Buddha. The larger, shared patio is found three stairs below this seating area.

Of course, we also incorporated our trademark space-making storage areas, unique lighting solutions, and energy-efficient elements in the form of radiant heat in the new slate floor and foam insulation in the exterior walls.

The homeowners in this project now feel that their space tells the right story about them. This is the kind of design to build™ challenge our designers love.

Mixed-Use Redevelopment Project Launches

IMG_1351

On deck this week: A mixed-use three-story building renovation in Fishtown. We are currently in the planning phase of this project with our client, who recently purchased this building “shell” with plans to renovate it into one residential rental unit, one commercial rental unit, and an apartment and studio space for her own use. There is also a garage that will be addressed at a later date.

We met with our client last week to discuss zoning issues. Without proper planning, the zoning approval and permit process could hold this project up for many months. However, Tamara and our architect thoroughly understand local zoning issues and where the various triggers for challenges lie — including facade, entrance, ADA and use issues, stair height requirements, property line setbacks, and such — so we expect to navigate through the zoning and planning phases very efficiently for our customer. This is especially important in the case of a commercial-use property like this one because the building owner wishes to get rental income flowing quickly.

Stay tuned for updates and photos as this project develops.

The Mindset of Custom Renovation

The average first-time buyer of a custom home renovation typically has to adjust their expectations about some aspect of the process. Why is this true? Nowadays, most people aren’t used to buying anything that is truly “custom made.” Most of us don’t hire tailors to make our suits, shirts, or dresses. We don’t go to milliners. We don’t have butchers who grind our beef to certain specifications. Even our most expensive cars are “off the rack” with limited options.

How do these points apply to home renovations? The houses we work on are typically 50 to 100 years old and built by a developer who had his own ideas about how homeowners might actually want to live in them. At that time, labor and raw materials were also relatively inexpensive, so houses and other handmade things were comparatively cheaper to build and maintain. Times have changed!

Labor is now very expensive, and truly bespoke projects can take longer than someone unaccustomed to the process would expect. However, we take the time to ensure that we create one-of-a-kind solutions to make each home meet modern standards and mesh with the way the homeowner wants to live. Our clients find that the time and financial investment necessary for the design, management, materials, budget, and labor of a truly custom home renovation project make the result well worth it in the end.