The Sexy Side of Home Insulation

This post is a continuation of my blog post about the truly sexy stuff that goes on behind your walls. I’ve been writing about these topics because we have been getting lots of calls from folks who are focused only on the shiny bits of their projects. The fact is, the shiny bits are not where the true value of a project lies, even if they are fun to use.
By the time most of our customers call us, they have spent many hours eyeing expensive, flashy items like new kitchen cabinets, high-gloss tile, chrome fixtures, and all the other glitzy things that go into a project. They can even quote the prices and technical features of these items. But the fact is, these are just the cherry on the sundae, the icing on the cake. They are “the fun stuff” that comes at the end of a complicated mix of science and art we apply to every single project we take on.
We find that most folks don’t even think about the parts of the renovation process that they consider mundane or boring. Take insulation, for example, or the larger, all-encompassing issue of efficiency.
Here are some really important energy-efficiency facts that you should consider when you are planning a renovation:
Our company works on older homes in the metro Philadelphia area. On any given week, we might be found working in an 1840s stone walled farmhouse or a 1950s wood-framed rancher. Because of the variety of houses we work on, we need to be armed with an array of efficiency solutions that will fit each project. And it all starts with insulation and plugging the leaks.
Here is a short list of some of the problems we have seen in various homes and solutions we have applied to each with some efficiency results! You will see not a single shiny thing is featured here. But stay focused and read on to see how truly sexy insulation can be!
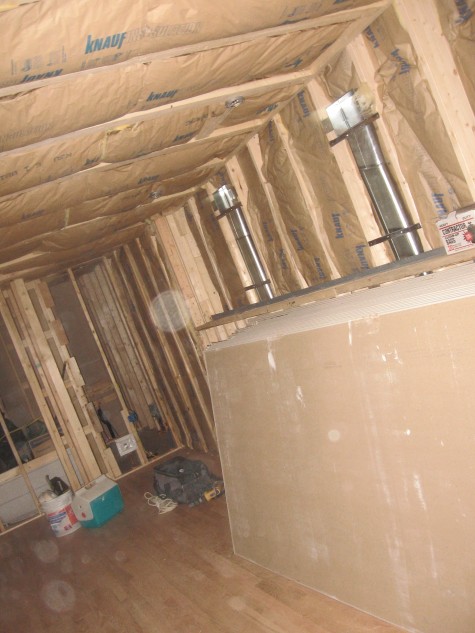
1860s Bucks County Farmhouse. This house had 22″ thick stone walls, the first floor was 19″ below grade, and it had no insulation at all. Solutions: (1) Windows and doors were not too bad, so we left them alone, adding only weather stripping to the original Dutch door. (2) We added 3” of closed cell foam in the framed wall areas, 6” of closed cell foam in the roof framing, and 2-3” closed cell foam in floor framing. Results: On the cold winter days we were working there after the foam was applied, we could heat the 850-square-foot building with two halogen work lamps. The outside temperature was 20 degrees or lower, and inside temps were in the high 50s. WOW. Imagine how comfy the place was after the new, high-efficiency heat pump was turned on.
1950s Split-level Rancher. This home had 2×4 framing on slab, with little or no insulation in the walls, under the slab or in the attic. Symptom: The HVAC ran constantly on hot or cold days. We get this complaint a lot. It’s a sure sign that insulation is a problem. Solutions: (1) We changed out two-thirds of the windows with larger, modern, high-efficiency windows for more light, better views, and fewer air leaks. (2) Several leaky doors were replaced with modern, insulated, full-light doors. (3) We insulated under the crawl space side of the first floor with fiberglass batting, and insulated the attic spaces with 8″ blown-in fiberglass. Results: A home better able to hold warmth or cool air inside, depending upon the season, and a significant reduction in energy use.
1920s Large Rowhouse with Two-story Rear Brick Addition. We worked on the first-floor kitchen area at the rear of this house, doing a full-gut kitchen remodel. Upon removing the home-flipper renovator’s drywall, we quickly spotted several mistakes and dangerous shortcuts they took. The insulation the flippers used was paper-faced 3″ fiberglass batting, but it was not installed properly. It was simply jammed into the wall stud bays. (That does not work, folks.) Properly installed paper-faced fiberglass batting is installed so that it’s not compacted, and it seals the spaces between the wall studs. Remember, air leaks are what cause heat loss and frozen pipes on a cold day. It’s like wearing a heavy coat on a single-digit day but forgetting to zip it closed. You will get frostbite.
Additionally, the flippers had installed a Jacuzzi tub in a second-floor bay area over and outside the kitchen, exposing all of the plumbing to the elements. Insulation in this area under the tub was negligible, with large gaps and insufficiencies. These were frozen pipes waiting to happen. Additionally, there was no insulation was under the kitchen floor.
Solutions: (1) To combat the cold air jetting through the leaky, old, brick walls, we used 1” of spray foam to seal the air leaks and 3” of properly installed faced fiberglass batting. (2) While the Jacuzzi area wasn’t in our direct scope, we did add some insulation under the tub while the ceiling was open. (We have seen lots of bathtubs installed in bays hanging out waiting for all the cold air. These are often the coldest part of the house with five planes on the exterior: three sides, top and bottom exposed to the elements. Not only is it an energy waster with more pipe-freeze opportunity, it’s also often freezing and uncomfortable in the tub.) (3) To help keep the kitchen floor warm, we opened the crawl space to the warm basement and insulated the crawl-space floor and walls on the outside of the building with foam.
Results: The whole space feels quieter, even though it’s on a busy city street. Quiet is a sure sign that a space is well sealed. While working on the job, our crew was also able to use the heater much less because the jets of cold air were gone.
1890s Three-story Rowhouse with Two-story Rear Section. We did a total gut remodel of a kitchen, powder room and pantry, with some minor improvements to the bedroom above. There was zero insulation in walls, floors or ceilings. Solutions: (1) We re-pointed the whole brick structure at the rear of the house to help seal it, as well as to return its structural integrity. (2) We insulated all of the walls with 3” fiberglass or foam, but the floors were left uninsulated because the basement area was warm. (3) We opened the kitchen crawl space to the main basement heat sources and insulated the crawl space’s outside walls. (4) We installed new, energy-efficient, historically appropriate windows in the bedroom bay. (5) We installed new, energy-efficient, historically appropriate windows in the kitchen and a full-light door to the backyard. (6) We insulated the bedroom bay wall and ceiling areas with spray-in, closed cell foam. Results: The bedroom is no longer drafty, the kitchen is toasty warm, and mice no longer visit through holes to the outside.
Summing up, to have the best effect on the efficiency of homes, your remodeler needs an array of products and methods at the ready. And, remember, insulation is a sexy and very important part of your home renovations. Even if you never think about it, your remodeler should!