
OUR BLOG
OUR BLOG
Check out what’s happening with Myers Constructs as well as the latest news and trends in home renovation.

The Art of Studio Design
We often receive requests to design spaces that integrate our customers' professional work into their homes. These spaces dedicated to our clients' needs to work, play, and be creative in their homes are sometimes single rooms, entire floors, or even entirely separate buildings! Not only do these studio spaces minimize costs by avoiding the need to rent space elsewhere, but they also maximize home and family time — a win/win, all around. Shown here is a his-and-hers art studio that we created at our clients' Manayunk residence. As the photos reveal, the interior finishes of these studios — such as hard-wearing plywood walls and floors, and a simple HVAC system — were chosen with the intent of making them true work spaces. During the design phase of this project, we really focused on getting the desired amount of natural light in the right orientation. Both studios have skylights, so[...]

Mixed-Use Redevelopment Project Launches
On deck this week: A mixed-use three-story building renovation in Fishtown. We are currently in the planning phase of this project with our client, who recently purchased this building "shell" with plans to renovate it into one residential rental unit, one commercial rental unit, and an apartment and studio space for her own use. There is also a garage that will be addressed at a later date. We met with our client last week to discuss zoning issues. Without proper planning, the zoning approval and permit process could hold this project up for many months. However, Tamara and our architect thoroughly understand local zoning issues and where the various triggers for challenges lie — including facade, entrance, ADA and use issues, stair height requirements, property line setbacks, and such — so we expect to navigate through the zoning and planning phases very efficiently for our customer. This is especially important[...]

When the Designer Becomes the Customer
I am a design to build remodeler. That means that I renovate other people's homes for a living. But when it came time recently to start my own living room remodel, I started the process the same way most of our clients do: by looking at magazines, websites, and other sources of inspiration. I knew the direction I wanted to take with the room, but was having some trouble with furniture selection. Sorting through these resources helped to narrow down my choices and get a feel for some of the textures, styles, and options out there. After taking some measurements, I then had to choose a professional who would be the right fit for this project. While I had the advantage of being able to wear two hats — that of the homeowner and the designer of the space — I still knew I'd want to bring in a pro[...]

The Mindset of Custom Renovation
The average first-time buyer of a custom home renovation typically has to adjust their expectations about some aspect of the process. Why is this true? Nowadays, most people aren't used to buying anything that is truly "custom made." Most of us don't hire tailors to make our suits, shirts, or dresses. We don't go to milliners. We don't have butchers who grind our beef to certain specifications. Even our most expensive cars are "off the rack" with limited options. How do these points apply to home renovations? The houses we work on are typically 50 to 100 years old and built by a developer who had his own ideas about how homeowners might actually want to live in them. At that time, labor and raw materials were also relatively inexpensive, so houses and other handmade things were comparatively cheaper to build and maintain. Times have changed! Labor is now very[...]

Hurricane Sandy and Your Home
If you're like most people in the greater Philadelphia area — or the greater Northeast coast, for that matter — you spent the weekend gearing up for the arrival of Hurricane Sandy by stocking up on nonperishables, batteries, propane, generators, and the like. And while most local schools and many workplaces have closed today, you are likely spending this time ensuring the security of your home and your family. We hope each of you safely rode out the storm. And rest assured that, if your home sustained any damage as a result of the high winds and flooding, you can count on us for help with all of your repair needs.
New In-Progress Slideshow Images
If you like the in-progress slideshows, we've added new images to each of the current ones. Enjoy.
Random Thoughts on “Big Box” Styling
When you walk through the home furnishings aisles in any of the "big box" retail stores, you will find that textiles, lighting and accessories are all offered in a general color range of brown, beige, or off-white. You may find the occasional splash of low-grade red or green in items like curtains or rugs, but that's as much diversity of style as you will find. We find this limited color scheme off-putting, especially when there are so many wonderful small boutique suppliers online and in most towns where you can find better quality items in a much broader color scheme that are created to work with the era of your home. The following are some pointers on finding good quality, “out-of-the-big-box” materials: Tile. Tile is made of clay with some color added into the mix of the glaze. Better colors, even earth tones, cost more than listless tans and beiges.[...]
A Quick Tour of Mario Batali’s Kitchen
A bit more counter clutter than we prefer, but still, a nicely put together workspace. Stay with it for a look at his wine storage room. The man is unapologetically oenophilic.
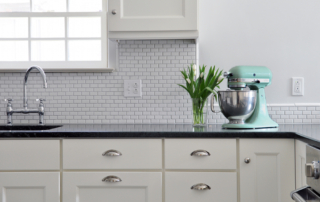
Sneak Peek: East Falls Kitchen Photo Shoot
Take a gander at this lovely image from a photo shoot conducted last week by Mark Gisi of Tabula Creative at one of our kitchen projects in East Falls: We couldn't be more pleased with the results of the shoot and of the project itself. When we began work on this kitchen, it was suffering from dated 1970s styling and poor cabinet layout and storage design that made the room feel cramped. Contributing to the problem was the fact that the kitchen was sharing space with the laundry facilities, and the room was also uncomfortably cold due to an inefficient heating design. The customers called us in to fix the temperature issues and make the style/design more harmonious with the handsome1920s house. They wanted a true cook's kitchen with logical storage areas and a relocation of the laundry area. The reconfigured room now features high-end Thermador appliances, white Medallion[...]
Different Customers, Different Outcomes: The Value of a Streamlined Process
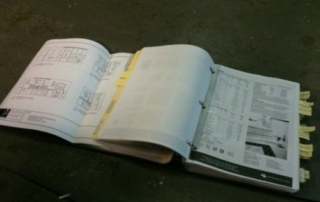
We recently received a phone call from a returning prospective client who had contacted us several months ago about doing a large kitchen/home remodel for her. At that time, we met with this homeowner and explained our process, presenting her with an example of our project book. This is a crucial tool we create for every home renovation project we undertake. It's kind of the "bible" of the project, as it contains every drawing, specification, permits, and all of the product information necessary to complete the job. During the time since we last spoke to her, the homeowner had explored doing the same project with a home builder who had turned to remodeling after new construction dried up. She found that the builder didn't use anything like our project book, and the spaces he created were unstylish, builder-grade solutions. So, seeing the value in our approach and appreciating the[...]
