A Day in the Life of a Kitchen Remodel — Step 5: Pre-Closing

pre-closing_540x211_

This week is all about framing, wiring, plumbing, and HVAC rough-ins. These items must be 100% complete before our Mt. Airy kitchen‘s scheduled mid-week inspections. after which we will seal the walls with insulation and drywall. It’s always an exciting time to see the design plans taking shape, but as you can imagine, this is also a very time-sensitive period of the job. If even one sub or work phase is late, it can bump other sections of the job and potentially affect the completion date. Because we are the general contractor on this project, our own crew members are working hard to ensure they are ready for each subcontractor as their turn in the schedule comes up.

Note that the panoramic view of this photo adds a curve to the appearance of the ceiling frame. In reality, it is perfectly straight!

Be sure to visit our facebook page for regular updates and photos on this project.

Revisit previous updates on this project:

Step 1: Planning

Step 2: Demolition

Step 3: Insulation and Framing

Step 4: Prepping for Inspection

P.S. We were excited to see this blog series mentioned in Remodeling Magazine’s daily newsletter last week!

A Day in the Life of a Kitchen Remodel — Step 4: Prepping for Inspection

2013-07-05 12.46.33_540x260_

There are many things happening this week in our Mt. Airy kitchen remodel as we prepare for inspection. This will require a lot of coordinating between the clients, all of our vendors, the design team, and the production team. We will all have to keep our “eyes on the ball.” Here is a snapshot of our plans for the week ahead:
Completion of mechanical and electrical rough-ins scheduling of inspection
Finishing the exterior holes for the new oven vent completion of final framing work
On-site measurements for the custom cabinetry
Finalization of customer selections and placing final order items
Once we are inspected and approved to close, we’ll finish the insulation and then move on to drywall. Be sure to visit our facebook page for regular updates and photos on this project.

Revisit previous updates on this project:

Step 1: Planning

Step 2: Demolition

Step 3: Insulation and Framing

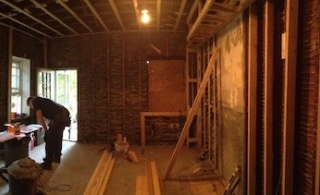
A Day in the Life of a Kitchen Remodel — Step 3: Insulation and Framing

2013-07-09 13.04.53_540x299_

This panoramic photo shows the action going on behind the walls in our Mt. Airy kitchen renovation. You can see how well the crew cleaned up after the demolition, and you can also view some of the framing materials that have arrived.

Take note of the horizontal wooden straps found in some of the walls. That’s the wood lath behind the plaster on the other side of the kitchen walls we demolished. You can also see old wiring and pipes, as well as the backside of the 16″ exterior stone walls.

What you can’t see is that much of this house contains balloon framing. That means the wall stud bays are continuous from the top of the basement to the bottom of the roof. In the case of a potential fire, the fire would shoot up these stud bays quickly, which is very dangerous. Therefore, we will install wooden fire blocking and fire-stopping foam in these stud bays at the floor and ceiling levels. Then, the exterior walls, rim joists, and new stud bay fire blocking will all get spray-in foam insulation to reduce drafts and improve energy efficiency.

Our carpenter, Bob, also has to “fur” the ceiling framing and wall studs to ensure that they are level and flat for drywall and soffit installation — especially important in an old home, where sagging in floors and ceilings is common!

Be sure to visit our facebook page for regular updates and photos on this project.

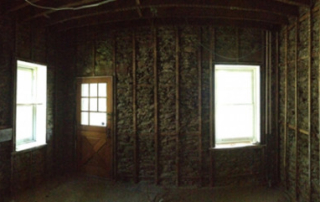
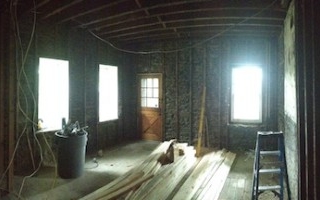
A Day in the Life of a Kitchen Remodel — Step 2: Demolition

demo 3

demo 2

As you can see, we are now well into the demolition phase of our project house in Mt. Airy. This is when all of the “old stuff” in the room is removed, and we get prepped for construction.

These images show the plastic and plywood barriers our crew has installed to help protect the rest of the house from the inevitable dust and debris that results from demolition. Because the house was built in the 1920s, the EPAs RRP/Lead Safe Remodeling Rules apply here, as they do to any house built before 1978. The plastic is 4 mm+, and we use plenty of duct tape to seal all around the doorway and the floor. All of the other doorways and A/C outlets in the kitchen will also be taped up and covered with plastic, as well. This is because all the plaster and the trim on the walls and ceiling are coming down today, and the many layers of flooring will be lifted to reveal the pine subflooring underneath. Some of those vinyl floor tiles and the floor glue can contain hazards like asbestos, so it’s important to err on the side of safety in this way.

The plywood box with black tape in the bottom image is a temporary “duct” our crew built for the A/C intake vent in the floor there. The temporary ducting is now taking in air from the clean living room and directing it into the home’s forced-air A/C system. Air contaminated with demolition dust containing lead will be scrubbed from the air inside the isolated kitchen by an air-scrubbing unit the demolition pros use. (We will show what one looks like in next week’s newsletter.)

When the team is finished removing all of the demolition debris, it will be bagged and then taped shut before being put into a dumpster and taken to an approved dumping site. We’ll then vacuum all of the demolished kitchen surfaces — including the floor, walls, and ceiling stud bays — to ensure the dust is completely removed.

The demolition will take 2 days to complete. During this time, our clients out of town are enjoying some peace and quiet.

Be sure to visit our facebook page for regular updates and photos on this project.

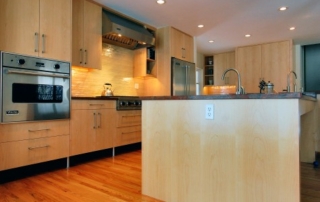
A Day in the Life of a Kitchen Remodel: Step 1 — Planning

1306251631_

Our Mt. Airy kitchen remodel is in full swing this week. We began with an on-site review to discuss the existing space and the planned changes. We were able to discuss special circumstances of the project, and the crew had a chance to meet the customers for the first time. We reminded the customers about the spaces we need for work and staging, and we carefully explained how we will protect their house throughout this process.

We then put together a detailed spreadsheet schedule that begins with site set up, including protections to the floors and dust control, as well as disconnects for the radiators. We then move on to RRP-certified demolition, electrical demolition, and rough framing. Once the framing is up, the electrical, HVAC, and plumbing systems can be roughed in and inspected. Finally, we tackle insulation, drywall, flooring, and finishes. Walking the client through this schedule allows them to anticipate exactly what will happen as their project unfolds.

Be sure to visit our facebook page for regular updates and photos on this project.

Time for a Home Checkup!

Just like you need to go to the dentist for regular routine maintenance, your home needs ongoing T.L.C. to keep it looking and feeling well. And just like delaying medical checkups, if you put it off these maintenance checks, your house will surely suffer for it in the long run.

We have been in business a long time, and we find that some folks simply don’t know where to get started with their routine maintenance plan. Luckily, we do! We offer the following programs to keep your home healthy, energy-efficient and in good order between larger projects. And we work with you to establish a schedule for prioritizing these tasks.

Base-Line Maintenance

Every home requires annual base-line maintenance. This includes everything from cleaning gutters and touching up varnish, paint and caulking, to power cleaning and oiling decks. We can also fix minor items like sticky door locks and broken screens. We can also identify and repair compromises in your home’s exterior to keep it in good order and prevent water from sneaking in. Keep in mind that these mini projects will have your home’s parts working better and looking cleaner, making them ready for full enjoyment all year round.

Read more

Fit and Finish

Being in the design to build business, I have a keen eye for when construction or design is not done “right.” This means that I catch a lot of details that most homeowners don’t. For example, I can see when a run of cabinets is out of level or square by even a small fraction of an inch. It’s also very clear to me when sections of wall are not square.

To illustrate, I’ll share an example here of what I call “Fit and Finish.”

Today, I visited a home that is less than 10 years old and located in a fairly pricey neighborhood. The people who live in this home have great style and taste, and they keep their home spotlessly clean. I love that. But I get so mad when I see how this newer home, like many others in its age range, are detailed. Disclaimer: I have every sympathy with an older home that shows bumps and rolls because of its age, but I have none for a new home that shows poor workmanship. There’s just no excuse for it. And if the walls aren’t square or the cabinets not straight, what about the other non-glamorous stuff in the building, like the roof or insulation? How good will they be? How long will this home and its components last? How will they perform?

If stock kitchen cabinets will be used in a newer home like this, the walls that contain these cabinet runs must be built plumb, level and square. The cabinet runs and rough ins must also be centered and allow for use of spacers at each end so the result will be “fitted.” In the case of this house, not enough room was provided for the cabinet run during the framing layout and plumbing and electrical rough ins. The result was that cabinet spacers were not used properly, so cabinet doors and drawers were not given adequate space to function properly.

In this kitchen, the very top of the line fridge was also supposed to be “fitted” into a small enclosure. But because the framing here was not properly done, the fridge and complementary cabinetry did not fit properly and were not symetrical when they should have been. So this very expensive fridge was not level and stood out to my eye.

Most people know that when you buy an article of clothing off the rack, you will probably have to take it to the tailor to have it fitted to your shape. A great tailor can make even an inexpensive article of clothing look great.

It’s the same with housing components like cabinets and appliances. It’s the job of the designer and carpenters to make sure these stock items fit a home properly. If they don’t, it’s a lot like bad tailoring.

Trust: The Cornerstone of the Contractor-Homeowner Relationship

A female homeowner recently confided in me that she is uncomfortable with allowing male contractors she doesn’t know into her house when she’s home alone or with her young children. “I personally get creeped out by it,” she explained. “Trust is everything, in that respect.”

I don’t think this is an uncommon sentiment because it is one we’ve heard many times before. After all, these contractors interact with homeowners’ families, children, pets, and personal spaces and items during a home-renovation project. People want to know that the companies they hire will treat them and their belongings with respect.

Read more

Older Homes – More Energy Efficient Than You Think

Older homes tend to get a bad rap for being energy inefficient. The truth is, many older homes have built-in energy-efficient systems that a homeowner should learn to use and, if possible, enhance. Here are some fake rolex examples of what I mean:

A stone or brick home with thick walls will retain heat in the winter and cool in the summer by way of its mass. Often, the older home will also have small windows on the third floor or attic. These are meant not only to allow light into the house, but also to allow hot air out in summer. Opening these small windows creates negative pressure inside the house, which then draws cool air from the basement. This is natural cooling at work. That’s because a basement’s mean temperature is between 60 and 70 degrees in summer. Utilizing this cooling air convection, combined with the thermal mass of the brick or stone home, means many of these homes can go several days at a time during a heat wave and not require any artificial air conditioning or cooling.

Since it’s heating season, we should also focus on some “passive” methods for making and keeping an older home warm.

Sash locks — These are the small closures on your double-hung windows you turn to lock them shut. You probably think they are for security, but they are really there to push the two sashes tightly into the sash frame and also to pull the sashes tightly together. This small piece of hardware makes your older wooden windows much more efficient by creating a tighter seal. Many older double-hung windows have not been properly maintained over the decades. The top sash might be stuck with paint, or the sash frame may be “out of square.” Other common problems are weights and chains that have failed. All of these problems can be fixed with some TLC and good carpentry. Happy to help; just give us a call.