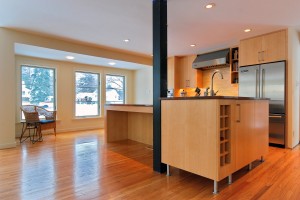
A Day in the Life of a Kitchen Remodel — Step 11: Detail, Trim Work, Appliances

finishing.up_Now that the cabinets are installed in our Mt. Airy kitchen, the project is coming to a head. Here is what’s happening this week:

  • Installation of extra bits and bobs on the cabinets, such as spacers and trim
  • Minor drywall/carpentry work
  • Installation of a transom window, a window to the outside, and three doors
  • Trimming out the windows, baseboards, and plumbing and electrical work
  • Installation of appliances

This is what we call “a hatful” of work. We depend on everyone being on schedule and working together to get it done. It is important for everyone to work cleanly and carefully so no damage happens to the finished products.

This is also the second most stressful time for the customers because they can see all the nice shiny new stuff, and their room looks like it should be ready to use, but it’s not quite there yet. All of these wee things still need to happen. We’re keeping the clients up to date during this furious crescendo. It’s not an easy time for anyone … but it’s all well worth it in the end.

Stay tuned to our facebook page for photos of the finished space!


Revisit previous updates on this project:

Step 1: Planning
Step 2: Demolition
Step 3: Insulation and Framing
Step 4: Prepping for Inspection
Step 5: Pre-Closing
Step 6: Drywall
Step 7: Cabinetry
Step 8: Cabinetry Pre-Installation
Step 9: Cabinetry Completion, Countertop and Flooring Prep
Step 10: Final Installations

Q and A: Checking in With Myers Constructs

As the busy fall home-renovation season kicks off, Myers Constructs co-owner Diane Menke sits down for a chat about breaking traditional design build paradigms, finding paths for growth in a difficult economy, and the surprising places where her team finds design inspiration.

Q: Tell us about your design to build philosophy.

DM: Generally speaking, design build is a model in which the design and construction phases of a renovation project are done in a streamlined fashion — often by having design and construction professionals team up in order to save time and money. Our approach is a different take on this concept. We do both design and construction in house, using a very tight system of steps we have developed over the years. We call it Design to Build™ because we only design projects to build them. We don’t spend a client’s financial resources on exploration of ideas that won’t be built. Our system uses proprietary designing and budgeting tools to ensure the design and construction phases of a project are developed with efficient precision, as well as with great style.

My business partner, Tamara Myers, and I developed this approach after dozens of frustrated homeowners started calling on us with their architect- and designer-driven designs that they couldn’t afford to buid. We both come from backgrounds in fine arts and crafts. While studying for our respective BFA degrees, we were expected to explore and understand departments outside of our major. This philosophy mirrored Germany’s Bauhaus Movement, in which artists were expected to understand all of the arts — craft media, 3D, 2D, color theory, architecture — because they are so interrelated. In addition, we were taught the history of these various media. That exploration helped explain world history, and how various media and styles of architecture, literature, music or crafts arrived in places around the world. If I had to use one phrase to describe this kind of education, it would be “stay curious.” This is how we approach the many disciplines of home renovation at our company. And it’s this curiosity that made it possible to develop a logical system to address the design and construction needs of the homeowners, but keep control of the budgets for them.

Q: What motivated you to break the traditional design build mold?

DM: We really wanted to form a strong, lasting business to take care of customers and employees really well, long term.

Read more

Saving Old Doors

These doors were first hung on this fine center city row house when Abraham Lincoln was president!

The wonderful old masonry in front has been stuccoed over unfortunately, probably in the 1980’s.

Now the city’s Historic Bureau sees to it that historical details on older homes are preserved. That is why these home owners have hired our company to help repair their masonry, windows and these doors.

Chris has removed this pair of doors to our shop for carpentry repair. In the mean time while they get “some lovin” from Chris, he has installed this pre hung door and plywood wall.

Stay tuned for the big reveal when these fine old doors and the rest of the project are complete, probably by end of June.

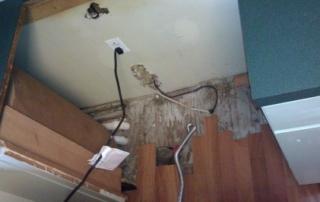
Examples of Unsafe Renos We See

Many homeowners have no idea that their kitchen or bathroom is a dangerous place — and could even potentially kill them or their loved ones. But we see bad renovations that create serious fire hazards quite often. Typically, what we find is that the finishes look just fine, but behind the scenes, there is danger lurking from lazy building practices.

To understand this point, take a look at this photo of a kitchen we’re currently renovating. This is an example of dangerous and illegal electrical work. This outlet is not a Ground Fault Circuit Interrupter, even though it is within 3 feet of a sink and dishwasher. We also think the range outlet was jumped to serve a light fixture in the basement, which is an illegal junction. The range should have its own circuit, instead of sharing it with lighting.

You can also see in the photo that the wood flooring does not extend all the way to the wall. This means the range will be hard to pull out for cleaning or service. It will also be hard to level, so it may wobble and cause the cakes baked in it to be lopsided. The range’s feet can also break easily when you try to move it.

Read more

Home Maintenance Tip: Air Leaks

This is the best time of year to locate air leaks in your older home. You will know you have them if you can feel drafts, or if your heater is working too hard.

Many people who live in older homes accept the discomfort of leaky windows and doors as “just the way it is” when, in reality, the fixes are very easy and inexpensive to make.

Start by taking a quick tour of your house and identifying the leaks and cold rooms; make a list of those you find. The typical areas of air leaks are any penetration in the “skin” of your home. That could mean a window or door, or a pipe or wire penetrating your home’s walls.

Then, tackle your list one leak at a time to reduce energy use and heating/cooling bills and increase the comfort of your home.

Often, simple chores like caulking, sealing with spray foam or a gasketing system can fix the problem in just a few minutes. If they can’t be fixed that quickly or easily, if a window or door really needs to be replaced, now is the time to start your springtime fix it list. Other less considered sources of air leaks are attic hatches and plumbing trouble doors. Believe it or not, these should be as well sealed (or better) as the doors and windows in your house. Typically, they are nothing more than a plywood sheet = very leaky! Gasketing should be around each of these to prevent air leaking, but still maintain easy use and access. This requires a bit of skill to do well, so call us when you have your fix it list and we’ll get these things done for you.

Phases of the Typical Home Interior Renovation

Design/Planning Phase –

This is an often overlooked, but very important, phase of any home renovation or repair project. Even if your project is as simple as hanging a door or painting a room, you need to start with a plan if you want to stay focused, do a good job, and get the project done.

With complicated projects like kitchens and baths, this is even more true. On many home shows, you’ll see designers and developers jump into a project with nothing more than a cabinet layout. They might walk around and talk about where they think they want some lights, doors and windows to go. That’s not a plan. It won’t tell the electrician or plumbers or carpenters where things are supposed to go, what is staying, and what is being demolished. You won’t know what the project will cost. Without a complete set of plans, you can’t get a construction permit, so your project may be worth less when you go to resell or refinance. Without a complete set of drawings, mistakes will be made, so you may end up paying even more to correct the mistakes made.

Read more

Older Homes – More Energy Efficient Than You Think

Older homes tend to get a bad rap for being energy inefficient. The truth is, many older homes have built-in energy-efficient systems that a homeowner should learn to use and, if possible, enhance. Here are some fake rolex examples of what I mean:

A stone or brick home with thick walls will retain heat in the winter and cool in the summer by way of its mass. Often, the older home will also have small windows on the third floor or attic. These are meant not only to allow light into the house, but also to allow hot air out in summer. Opening these small windows creates negative pressure inside the house, which then draws cool air from the basement. This is natural cooling at work. That’s because a basement’s mean temperature is between 60 and 70 degrees in summer. Utilizing this cooling air convection, combined with the thermal mass of the brick or stone home, means many of these homes can go several days at a time during a heat wave and not require any artificial air conditioning or cooling.

Since it’s heating season, we should also focus on some “passive” methods for making and keeping an older home warm.

Sash locks — These are the small closures on your double-hung windows you turn to lock them shut. You probably think they are for security, but they are really there to push the two sashes tightly into the sash frame and also to pull the sashes tightly together. This small piece of hardware makes your older wooden windows much more efficient by creating a tighter seal. Many older double-hung windows have not been properly maintained over the decades. The top sash might be stuck with paint, or the sash frame may be “out of square.” Other common problems are weights and chains that have failed. All of these problems can be fixed with some TLC and good carpentry. Happy to help; just give us a call.

When It Comes to Older Homes, Small Is Not the New Big

In the world of new construction, the mantra is “small is the new big.” This means that people who are building new homes appear to be tired of — or can simply no longer afford — the ostentatious 5,000+ square foot McMansions that were so popular during the last decade. In our business, however, where we work on older homes in and around metro Philadelphia, the opposite is true. We get a lot of calls from folks requesting additions for their homes. They simply want and need more space.

Read more

90% Done, 75% to Go!

When it comes to closing a renovation project, that old saying holds true: the devil is in the details. It’s a time when having logged your 10,000 hours counts, and we’ve even coined a phrase for it: “90% done, 75% to go.” Because while the big, fancy and expensive pieces are installed and complete, there is still a large pile of teeny, tiny details to get done. It’s these details — the last 75% — that make your project look finished.

Here is a snap of some of the things that still need to be installed at this small, whole-house renovation we’re doing for the city’s Neighborhood Stabilization Program. The house is in a nice neighborhood in the city’s East Mount Airy section. It’s not a fancy project, but the details still count.

Read more

Trip to Rhinebeck and Learning From The Past

I just returned from a weekend jaunt to Rhinebeck, NY, a charming village located 100 miles north of New York City that was settled by both English and Dutch settlers in the 1600s. Rhinebeck. My visit to this town brought to mind a book I recently read, “Home, a Short History of an Idea,” by Witold Rybczynski. In it, the author explains where our modern ideas about what makes a “home” come from. For all of us who live in or work on old houses, this book is a must read.

Rybczynski explains how the Dutch design of the home informed our American way of thinking of the idea of “home.” What do we all think of when we think of home? It’s a place for a family unit. The fact that your home’s shape answers your family’s needs is a Dutch invention. It’s more than just shelter. It’s about comfort and ease and privacy — all newly imposed criteria for home.

Read more