A Day in the Life of a Kitchen Remodel — Step 4: Prepping for Inspection

2013-07-05 12.46.33_540x260_

There are many things happening this week in our Mt. Airy kitchen remodel as we prepare for inspection. This will require a lot of coordinating between the clients, all of our vendors, the design team, and the production team. We will all have to keep our “eyes on the ball.” Here is a snapshot of our plans for the week ahead:
Completion of mechanical and electrical rough-ins scheduling of inspection
Finishing the exterior holes for the new oven vent completion of final framing work
On-site measurements for the custom cabinetry
Finalization of customer selections and placing final order items
Once we are inspected and approved to close, we’ll finish the insulation and then move on to drywall. Be sure to visit our facebook page for regular updates and photos on this project.

Revisit previous updates on this project:

Step 1: Planning

Step 2: Demolition

Step 3: Insulation and Framing

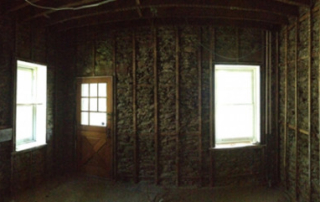
A Day in the Life of a Kitchen Remodel — Step 3: Insulation and Framing

2013-07-09 13.04.53_540x299_

This panoramic photo shows the action going on behind the walls in our Mt. Airy kitchen renovation. You can see how well the crew cleaned up after the demolition, and you can also view some of the framing materials that have arrived.

Take note of the horizontal wooden straps found in some of the walls. That’s the wood lath behind the plaster on the other side of the kitchen walls we demolished. You can also see old wiring and pipes, as well as the backside of the 16″ exterior stone walls.

What you can’t see is that much of this house contains balloon framing. That means the wall stud bays are continuous from the top of the basement to the bottom of the roof. In the case of a potential fire, the fire would shoot up these stud bays quickly, which is very dangerous. Therefore, we will install wooden fire blocking and fire-stopping foam in these stud bays at the floor and ceiling levels. Then, the exterior walls, rim joists, and new stud bay fire blocking will all get spray-in foam insulation to reduce drafts and improve energy efficiency.

Our carpenter, Bob, also has to “fur” the ceiling framing and wall studs to ensure that they are level and flat for drywall and soffit installation — especially important in an old home, where sagging in floors and ceilings is common!

Be sure to visit our facebook page for regular updates and photos on this project.

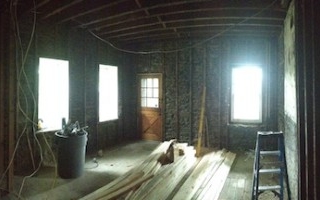
A Day in the Life of a Kitchen Remodel — Step 2: Demolition

demo 3

demo 2

As you can see, we are now well into the demolition phase of our project house in Mt. Airy. This is when all of the “old stuff” in the room is removed, and we get prepped for construction.

These images show the plastic and plywood barriers our crew has installed to help protect the rest of the house from the inevitable dust and debris that results from demolition. Because the house was built in the 1920s, the EPAs RRP/Lead Safe Remodeling Rules apply here, as they do to any house built before 1978. The plastic is 4 mm+, and we use plenty of duct tape to seal all around the doorway and the floor. All of the other doorways and A/C outlets in the kitchen will also be taped up and covered with plastic, as well. This is because all the plaster and the trim on the walls and ceiling are coming down today, and the many layers of flooring will be lifted to reveal the pine subflooring underneath. Some of those vinyl floor tiles and the floor glue can contain hazards like asbestos, so it’s important to err on the side of safety in this way.

The plywood box with black tape in the bottom image is a temporary “duct” our crew built for the A/C intake vent in the floor there. The temporary ducting is now taking in air from the clean living room and directing it into the home’s forced-air A/C system. Air contaminated with demolition dust containing lead will be scrubbed from the air inside the isolated kitchen by an air-scrubbing unit the demolition pros use. (We will show what one looks like in next week’s newsletter.)

When the team is finished removing all of the demolition debris, it will be bagged and then taped shut before being put into a dumpster and taken to an approved dumping site. We’ll then vacuum all of the demolished kitchen surfaces — including the floor, walls, and ceiling stud bays — to ensure the dust is completely removed.

The demolition will take 2 days to complete. During this time, our clients out of town are enjoying some peace and quiet.

Be sure to visit our facebook page for regular updates and photos on this project.

A Day in the Life of a Kitchen Remodel: Step 1 — Planning

1306251631_

Our Mt. Airy kitchen remodel is in full swing this week. We began with an on-site review to discuss the existing space and the planned changes. We were able to discuss special circumstances of the project, and the crew had a chance to meet the customers for the first time. We reminded the customers about the spaces we need for work and staging, and we carefully explained how we will protect their house throughout this process.

We then put together a detailed spreadsheet schedule that begins with site set up, including protections to the floors and dust control, as well as disconnects for the radiators. We then move on to RRP-certified demolition, electrical demolition, and rough framing. Once the framing is up, the electrical, HVAC, and plumbing systems can be roughed in and inspected. Finally, we tackle insulation, drywall, flooring, and finishes. Walking the client through this schedule allows them to anticipate exactly what will happen as their project unfolds.

Be sure to visit our facebook page for regular updates and photos on this project.

How Much Will My New Kitchen Cost?

(Part 1 in a series that examines our customers’ most frequently asked questions.)

New clients often call us wanting to know what a new kitchen will cost them. The simple answer? Until we visit their home and find out what they want us to spec out for the project, we don’t know what the exact price will be. But we can provide some general pricing information. Kitchen remodels can run from $15,000 to well over $200,000. However, most of our kitchen customers spend between $45,000 and $90,000 for a soup-to-nuts, gut-to-the-studs-and joists total refit to their kitchen.

Let’s take a look at what one of our kitchens in this average price range looks like. This is what we mean when we say “gutted”:

IMG_6429_540x655_

In this case, we didn’t take the floor down to the joists, but that happens on many projects in older houses. We gut a room like this because the system of mechanicals, structure, and vapor control behind the walls does not meet code requirements or is not performing adequately. We need to open everything up to bring it to modern performance standards and code. For this project, we also had to jack up the small bay the kitchen sink sits in, and install a replacement beam for the one you see in this picture. Over time, the bay had drooped more than two inches because the builder used undersized structural components.

We installed all new wiring, lighting, plumbing, insulation, drywall, and ceilings. After that came some very nice quality modern cabinets, stone, backsplash, and appliances. A few more nice touches, and it looked like this:

stove.view_540_

Most clients then ask “Why is there such a big price range?” and “What do I get for my money?” If you have $15,000 to spend, chances are you are going to be doing the job yourself or working with an unlicensed, uninsured carpenter charging a nominal hourly rate. This will be a simple room re-fit that includes the following:

  • No new plumbing, electrical, or structural work
  • Self-management of the project, including selection and ordering the products
  • Reuse of existing appliances or purchasing inexpensive replacements
  • Simple, inexpensive lighting solutions
  • Low-quality cabinetry and countertops
  • DIY painting of the finished room.

If you are spending $45,000 to $200,000 or more, your project will likely have a scope that includes:

  • A design-to-build general contractor to manage all facets of your remodel
  • Gutting the room to the studs to run new electric, plumbing, and heat
  • High-end appliance packages, such as Miele, Wolf, Sub-Zero, Thermador
  • Custom or high-end cabinets
  • Granite, soapstone, or similar countertops
  • High-end tile backsplash
  • New floors
  • A complete lighting plan that includes ceiling, task, and under-cabinet lighting
  • Possibly structural changes to open the kitchen to another room in the house
  • Possibly inclusion of a new adjacent mudroom, laundry, or powder room.

Over the past year, we have seen many customers seeking alternatives to this comprehensive kitchen package approach. Some want to have their own subcontractors handle some sections of the work. Some want to specify and buy their own countertops or appliances. We handle these requests on a case-by-case basis, but generally speaking, we are happy to work with clients who want to handle some tasks on their own, as long as those changes do not alter the scope or schedule of the project.

Have additional remodeling questions you need answered? Please don’t hesitate to ask.

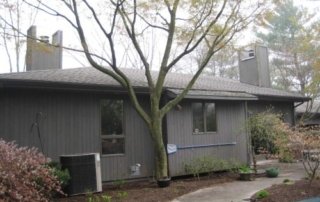
When It Comes to Home Renovation, the Band-Aid Approach Just Won’t Do

replica watches

When working on old houses, problems invariably arise. More often than not, they involve compromised systems in the home.

Recently, for example, we worked on a very nice mid-century house, where we gutted and replaced the old kitchen. In the process of that project, some of the home’s systems came up for special scrutiny. Structural problems were found in the roof rafters over the kitchen. They were all cut by the builder 4 feet too short to reach out over the kitchen bump out, where the sink was located. The builder tied on to the rafters a few 4-foot lengths of 2×4, to extend the roof there. That resulted in the bump out dropping over an inch. While we had the ceiling open, it was a fairly easy fix for us to create properly sized rafter tail extensions and jack up the droopy bump out.

All of the water pipes in the house were crossed by the previous homeowner for some reason and run in the unheated attic. The clients said they had never had frozen pipes, so we didn’t relocate them but did let the clients know that the attic was a weird place to run them. In the process of re-plumbing their new kitchen, and cleaning up the pipes, we could see there and in the basement, we created a pipe bang in one of the bathrooms on the far side of the house, even though we hadn’t done any work in that bathroom. The simple explanation was that our effort to make the plumbing more logical locally resulted in pressure banging elsewhere in the less logical section of the building.

So what to do? The client was not happy with the bang, but she understood it was not a mistake on our part. However, we didn’t want our clients to have to live with the noise, either. So our plumber set to work trying to locate the pressure bang and fix it. We knew it might take a few tries to figure it out, and sure enough, it did. It’s complicated, but essentially metal bangs on metal in the shower faucet body when the water elsewhere in the house is shut on or off. So now we know we needed to replace that shower faucet with a new one. High-quality replica watches are popular with young men.

Most contractors would not have plugged away at these problems until they were resolved. They would have completed what was on their task list, collected their check, and gone home. But we hung in there to make things right. Sure, the clients can get frustrated by these kinds of problems. (“Why did THIS have to happen? Why isn’t THIS fixed yet? What did my contractor do to cause THIS?”) But we were lucky to have a client who understood that chronology does not equal causality. She trusted that we were working in her best interest. She asked good questions and listened to what we explained.

This kind of attention and service costs more, but, in the end, which would you rather have: A covered-up, droopy kitchen bump out and plumbing bang or your house fixed properly?

Chestnut Hill Kitchen/Powder Room Reno

Today, we are beginning the construction portion of a small kitchen and powder room renovation in Chestnut Hill. This cute, Tudor-style twin is home to two adults, two kids, and a senior-age dog.

The kitchen was no longer functioning well for this family. Here is their wish list:

  • Better flow/space function/circulation
  • Better/more prep area
  • New location for the fridge, which is currently in the unheated shed area out back
  • Better storage
  • Better work surfaces
  • Better kitchen efficiency
  • Open plan kitchen/dining room to engage the whole family
  • Better venting of cooking area
  • Better lighting
  • A more discreet powder room
  • Better pantry use
  • Staging area for lunch boxes, keys and things that need charging
  • Better organization of the many doors in the room that access powder room, pantry and basement
  • Stay tuned for updates on how this project is coming along!