“Big Picture” Renovations: Pulling Together the Pieces to Make a Grander Whole

Sometimes, we take on project homes where the individual main rooms are in good — or even great — condition, but the house needs an overall upgrade. That was the case for this 1980s-era stucco single English manor-style house in Chestnut Hill.

While it’s an attractive structure that includes a two-car garage and a lovely gated backyard with lots of mature plantings, the home had been a rental for a while, and was a bit worn and somewhat outdated when our clients bought it in order to downsize. It had a lot of builder-grade trims and doors, as well as plain drywall throughout much of the lower level. In addition, the house, which is rather sizable at 3,000 sf, felt rather choppy and not at all as grand as it could be. Our job was to give the house character and definition, particularly throughout the first floor.

Here are the solutions we implemented on the lower level:

  • Created and applied an appealing trim, door, and panel program that created a cohesive look and feel that added interest to the walls.
  • Reorganized and upgraded the kitchen range and hood to modernize the appliances and provide better functional space. (Proportions rule! When you have the right proportions, everything feels right.)
  • We will also replace a dated brown glass tile backsplash with new simple running bond tile that has a handmade feel.
  • Installed a new vanity sink, counter, and toilet in the powder room.
  • Installed new oak flooring throughout the kitchen and powder room to blend with the existing flooring, and stained all of the floors in the house a medium-dark brown.
  • Upgraded the lighting fixtures, switches, and outlets. This includes the removal of a Gothic chandelier hanging over the kitchen island and a builder-grade “Italianate” tray ceiling with lighting, which left the whole ceiling simpler and cleaner.
  • Helped select colors and finishes that tie the various rooms together and complement the homeowners’ furnishings, including a mix of new items and things moved from their previous home.

And on the second floor:

  • Created new “his-and-hers” walk-in closets in the master bedroom. We drew up the floorplan of the room with the furniture our clients wanted to use, and then identified the logical placement of the closets. We also moved and upgraded the lighting outlets and switches so they made more sense. By adding inches to the width, a foot to the length, and installing pocket doors, we freed up floor and furnishing space, and netted our clients a walk-in closet more appropriate to a master bedroom. The previous closets, while somewhat large, were not originally laid out for the sizes needed to get the maximum hanging and storage space.
  • Helped refit the clients’ existing custom office furniture into their new office space. Again, we drew a floorpan to determine where their belongings would best fit.
  • Assisted with selecting colors, lighting fixtures, and accessories.

In the end, we didn’t move any walls (except for the master closets), and we didn’t do full renovations of the kitchen or bathrooms, but we did make this house feel a lot grander. Now, when these clients entertain or return home from their work travels, they can feel their house wrap around them with solid comfort and long-lasting style.

Retirement Planning: Design With an Eye to the Future

Myers Constructs Inc. can help you with your retirement renovation planning

Here in our office, we are seeing an uptick in calls from prospective clients who are preparing for retirement. Some are planning ahead for “aging in place,” if they plan to live in their homes long term, while others are making modifications for their aging parents or special-needs children who live with them. Our challenge in these projects is determining how to successfully update these older homes to make them more accessible and accommodating while factoring in the changing needs of the families who live there. Here’s a look at our process.

The first step is conducting a survey of the house to learn how it currently works. We then interview the homeowners and any in-home care providers about the pros and cons of the existing space. This allows us to learn how the house fits the needs of the people living in it and what changes need to be made. These problems find solutions in the planning phase, where the renovations are “built” on paper first. Those solutions often include the following:

Additions — A multi-story home might require a first-floor addition to accommodate the needs of someone in a wheelchair or who is no longer comfortable with stairs. We can even incorporate an elevator into a long-term plan, and the designated space can be used for closet storage until the elevator is needed.

Doorways and Hallways — These elements can be widened or removed altogether.

Accessible Bathrooms — They are fairly simple to design, and can be very stylish, as well. They don’t need to look like hospital bathrooms.

Accessible Kitchens — These can be very chic spaces everyone enjoys using together. Anyone should be able to operate a great kitchen, even if they are in a chair or scooter, have arthritis, or are simply aging. There are many great products we can specify to help with accessing cabinets, doors, appliances, faucets, and the like.

Lighting — This is a feature we notice more as we age and our eyes become weaker. Where a few high hats in the kitchen would have been fine for someone in their 30s, a middle-aged or older person will need much more light. Sight-impaired individuals obviously have other special lighting needs. Knowing what a person needs now and in the future helps us to design needed features into a project.

The key to accessible homes is making them logical, attractive, and easy to use for everyone, no matter their abilities. They are not hard to do well, but they do require some thoughtfulness and good planning.


Image: garryknight

A Day in the Life of a Kitchen Remodel — Step 9: Cabinetry Completion, Countertop and Flooring Prep

puppy pads

If you are following our Mt. Airy kitchen renovation on Facebook, you know that the cherry base cabinets were unloaded and installed late last week. Because the upper cabinets are painted, they were finished at the factory in a second run and will be delivered shortly.

Also this week, the flooring pro is scraping, sanding, priming, and sealing the Gypcrete floor underlay in preparation for the installation of the Forbo Marmoleum floor. The stone and wood counters are being templated on Wednesday, and the carpenter will return to the puppy pads site this week to double-check a few items on his list that need to be perfect before the rest of the cabinets and counters are installed.

We will next need to temporarily remove a couple of base cabinets for the flooring to be installed. This is because the flooring material can only be manipulated so much before it cracks, so we need to provide extra clearance. Bespoke projects can be a bit of a juggling act. Sometimes, there is a bit of back and forth to get the fit just right.

Have a wonderful week,

The Myers Constructs Team


Revisit previous updates on this project:

Step 1: Planning
Step 2: Demolition
Step 3: Insulation and Framing
Step 4: Prepping for Inspection
Step 5: Pre-Closing
Step 6: Drywall
Step 7: Cabinetry
Step 8: Cabinetry Pre-Installation

A Day in the Life of a Kitchen Remodel — Step 8: Cabinetry Pre-Installation

1308280650_cabs_resized_

As we head into the holiday weekend, you can see that the new custom cabinetry is being assembled for our Mt. Airy kitchen. The clients chose rich “bamboo” stained solid cherry drawers and doors with cherry plywood boxes. Our Bucks County-based cabinetmaker is currently installing the hardware — including fancy Euro hinges, soft-close mechanisms, and leveling feet — as well as doors and drawers.

Our customers are patiently waiting for delivery and installation of the bases this week, with wall cabinets to follow in the next week.

Be sure to visit our facebook page for regular updates and photos on this project.

Have a Happy Labor Day!

The Myers Constructs Team

Revisit previous updates on this project:

Step 1: Planning
Step 2: Demolition
Step 3: Insulation and Framing
Step 4: Prepping for Inspection
Step 5: Pre-Closing
Step 6: Drywall
Step 7: Cabinetry

A Day in the Life of a Kitchen Remodel — Step 6: Drywall

finaldrywall-4

Customers often find the drywall phase the most uncomfortable phase of any project. Drywall is dusty, and it gets everywhere. In the case of our Mt. Airy kitchen, the clients were smart to avoid this process by scheduling a short trip out of town. The upside? This is also an exciting period in any project. Once customers can see the walls, they can begin to picture the finished project in “real space.”

Our next tasks are to get the in-floor heating installed and the new level floor poured. After that, we are into paint, trim, counters, tile, and cabinets: the shiny bits!

Be sure to visit our facebook page for regular updates and photos on this project.


Revisit previous updates on this project:

Step 1: Planning

Step 2: Demolition

Step 3: Insulation and Framing

Step 4: Prepping for Inspection

Step 5: Pre-Closing

A Day in the Life of a Kitchen Remodel — Step 5: Pre-Closing

pre-closing_540x211_

This week is all about framing, wiring, plumbing, and HVAC rough-ins. These items must be 100% complete before our Mt. Airy kitchen‘s scheduled mid-week inspections. after which we will seal the walls with insulation and drywall. It’s always an exciting time to see the design plans taking shape, but as you can imagine, this is also a very time-sensitive period of the job. If even one sub or work phase is late, it can bump other sections of the job and potentially affect the completion date. Because we are the general contractor on this project, our own crew members are working hard to ensure they are ready for each subcontractor as their turn in the schedule comes up.

Note that the panoramic view of this photo adds a curve to the appearance of the ceiling frame. In reality, it is perfectly straight!

Be sure to visit our facebook page for regular updates and photos on this project.

Revisit previous updates on this project:

Step 1: Planning

Step 2: Demolition

Step 3: Insulation and Framing

Step 4: Prepping for Inspection

P.S. We were excited to see this blog series mentioned in Remodeling Magazine’s daily newsletter last week!

A Day in the Life of a Kitchen Remodel — Step 4: Prepping for Inspection

2013-07-05 12.46.33_540x260_

There are many things happening this week in our Mt. Airy kitchen remodel as we prepare for inspection. This will require a lot of coordinating between the clients, all of our vendors, the design team, and the production team. We will all have to keep our “eyes on the ball.” Here is a snapshot of our plans for the week ahead:
Completion of mechanical and electrical rough-ins scheduling of inspection
Finishing the exterior holes for the new oven vent completion of final framing work
On-site measurements for the custom cabinetry
Finalization of customer selections and placing final order items
Once we are inspected and approved to close, we’ll finish the insulation and then move on to drywall. Be sure to visit our facebook page for regular updates and photos on this project.

Revisit previous updates on this project:

Step 1: Planning

Step 2: Demolition

Step 3: Insulation and Framing

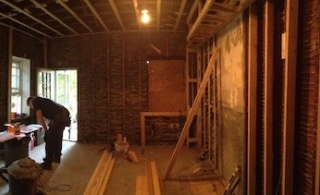
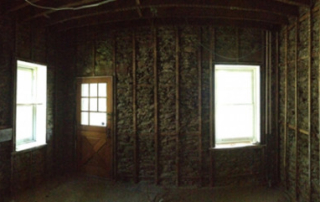
A Day in the Life of a Kitchen Remodel — Step 3: Insulation and Framing

2013-07-09 13.04.53_540x299_

This panoramic photo shows the action going on behind the walls in our Mt. Airy kitchen renovation. You can see how well the crew cleaned up after the demolition, and you can also view some of the framing materials that have arrived.

Take note of the horizontal wooden straps found in some of the walls. That’s the wood lath behind the plaster on the other side of the kitchen walls we demolished. You can also see old wiring and pipes, as well as the backside of the 16″ exterior stone walls.

What you can’t see is that much of this house contains balloon framing. That means the wall stud bays are continuous from the top of the basement to the bottom of the roof. In the case of a potential fire, the fire would shoot up these stud bays quickly, which is very dangerous. Therefore, we will install wooden fire blocking and fire-stopping foam in these stud bays at the floor and ceiling levels. Then, the exterior walls, rim joists, and new stud bay fire blocking will all get spray-in foam insulation to reduce drafts and improve energy efficiency.

Our carpenter, Bob, also has to “fur” the ceiling framing and wall studs to ensure that they are level and flat for drywall and soffit installation — especially important in an old home, where sagging in floors and ceilings is common!

Be sure to visit our facebook page for regular updates and photos on this project.

A Day in the Life of a Kitchen Remodel — Step 2: Demolition

demo 3

demo 2

As you can see, we are now well into the demolition phase of our project house in Mt. Airy. This is when all of the “old stuff” in the room is removed, and we get prepped for construction.

These images show the plastic and plywood barriers our crew has installed to help protect the rest of the house from the inevitable dust and debris that results from demolition. Because the house was built in the 1920s, the EPAs RRP/Lead Safe Remodeling Rules apply here, as they do to any house built before 1978. The plastic is 4 mm+, and we use plenty of duct tape to seal all around the doorway and the floor. All of the other doorways and A/C outlets in the kitchen will also be taped up and covered with plastic, as well. This is because all the plaster and the trim on the walls and ceiling are coming down today, and the many layers of flooring will be lifted to reveal the pine subflooring underneath. Some of those vinyl floor tiles and the floor glue can contain hazards like asbestos, so it’s important to err on the side of safety in this way.

The plywood box with black tape in the bottom image is a temporary “duct” our crew built for the A/C intake vent in the floor there. The temporary ducting is now taking in air from the clean living room and directing it into the home’s forced-air A/C system. Air contaminated with demolition dust containing lead will be scrubbed from the air inside the isolated kitchen by an air-scrubbing unit the demolition pros use. (We will show what one looks like in next week’s newsletter.)

When the team is finished removing all of the demolition debris, it will be bagged and then taped shut before being put into a dumpster and taken to an approved dumping site. We’ll then vacuum all of the demolished kitchen surfaces — including the floor, walls, and ceiling stud bays — to ensure the dust is completely removed.

The demolition will take 2 days to complete. During this time, our clients out of town are enjoying some peace and quiet.

Be sure to visit our facebook page for regular updates and photos on this project.

A Day in the Life of a Kitchen Remodel: Step 1 — Planning

1306251631_

Our Mt. Airy kitchen remodel is in full swing this week. We began with an on-site review to discuss the existing space and the planned changes. We were able to discuss special circumstances of the project, and the crew had a chance to meet the customers for the first time. We reminded the customers about the spaces we need for work and staging, and we carefully explained how we will protect their house throughout this process.

We then put together a detailed spreadsheet schedule that begins with site set up, including protections to the floors and dust control, as well as disconnects for the radiators. We then move on to RRP-certified demolition, electrical demolition, and rough framing. Once the framing is up, the electrical, HVAC, and plumbing systems can be roughed in and inspected. Finally, we tackle insulation, drywall, flooring, and finishes. Walking the client through this schedule allows them to anticipate exactly what will happen as their project unfolds.

Be sure to visit our facebook page for regular updates and photos on this project.