“Big Picture” Renovations: Pulling Together the Pieces to Make a Grander Whole

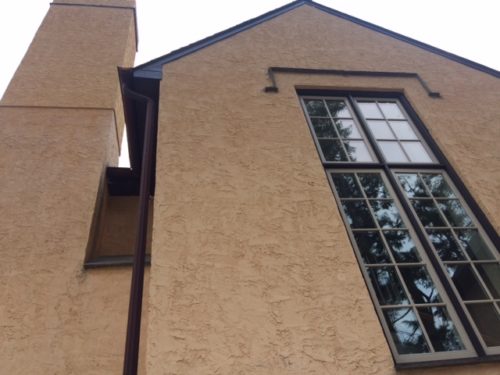
Sometimes, we take on project homes where the individual main rooms are in good — or even great — condition, but the house needs an overall upgrade. That was the case for this 1980s-era stucco single English manor-style house in Chestnut Hill.

While it’s an attractive structure that includes a two-car garage and a lovely gated backyard with lots of mature plantings, the home had been a rental for a while, and was a bit worn and somewhat outdated when our clients bought it in order to downsize. It had a lot of builder-grade trims and doors, as well as plain drywall throughout much of the lower level. In addition, the house, which is rather sizable at 3,000 sf, felt rather choppy and not at all as grand as it could be. Our job was to give the house character and definition, particularly throughout the first floor.

Here are the solutions we implemented on the lower level:

  • Created and applied an appealing trim, door, and panel program that created a cohesive look and feel that added interest to the walls.
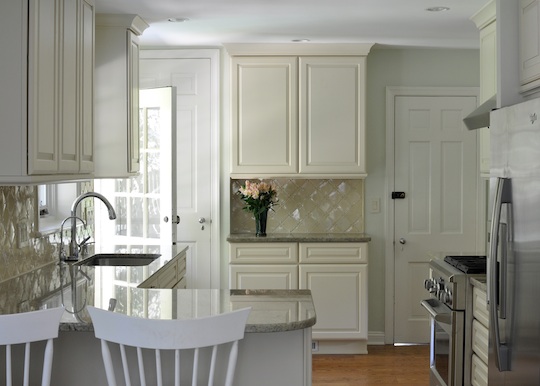
  • Reorganized and upgraded the kitchen range and hood to modernize the appliances and provide better functional space. (Proportions rule! When you have the right proportions, everything feels right.)
  • We will also replace a dated brown glass tile backsplash with new simple running bond tile that has a handmade feel.
  • Installed a new vanity sink, counter, and toilet in the powder room.
  • Installed new oak flooring throughout the kitchen and powder room to blend with the existing flooring, and stained all of the floors in the house a medium-dark brown.
  • Upgraded the lighting fixtures, switches, and outlets. This includes the removal of a Gothic chandelier hanging over the kitchen island and a builder-grade “Italianate” tray ceiling with lighting, which left the whole ceiling simpler and cleaner.
  • Helped select colors and finishes that tie the various rooms together and complement the homeowners’ furnishings, including a mix of new items and things moved from their previous home.

And on the second floor:

  • Created new “his-and-hers” walk-in closets in the master bedroom. We drew up the floorplan of the room with the furniture our clients wanted to use, and then identified the logical placement of the closets. We also moved and upgraded the lighting outlets and switches so they made more sense. By adding inches to the width, a foot to the length, and installing pocket doors, we freed up floor and furnishing space, and netted our clients a walk-in closet more appropriate to a master bedroom. The previous closets, while somewhat large, were not originally laid out for the sizes needed to get the maximum hanging and storage space.
  • Helped refit the clients’ existing custom office furniture into their new office space. Again, we drew a floorpan to determine where their belongings would best fit.
  • Assisted with selecting colors, lighting fixtures, and accessories.

In the end, we didn’t move any walls (except for the master closets), and we didn’t do full renovations of the kitchen or bathrooms, but we did make this house feel a lot grander. Now, when these clients entertain or return home from their work travels, they can feel their house wrap around them with solid comfort and long-lasting style.

What’s Old Is New Again — and Better Than Ever

We have spent decades becoming experts at breathing new life into old structures throughout the Greater Philadelphia region. And now Tamara is busy preparing a presentation on this topic — adaptive reuse — that she will make at The 2016 Kitchen & Bath Industry Show (KBIS) at the Las Vegas Convention Center on January 21. While this presentation is geared towards industry insiders who will earn continuing education credits for their participation, we are eager to share with you our insights on some exciting and effective approaches to sustainable adaptive reuse that can be applied not only to adaptive reuse projects but also to renovations in your own home. In the coming weeks, we’ll cover the following topics:

  • Why the choice to renovate existing structures is vital to a sustainable future;
  • Examples of buildings and spaces already integrated into our community that illustrate adaptive re-use and what makes some of these successful and others not;
  • Key principles for successful adaptive reuse of buildings, such as former sacred spaces, barns, lofts, warehouses — even gas stations — and how those principles should be applied universally to our renovation projects.

In the Works: Closing Walls and Opening the Window to 2016

IMG_1482

Last week, we received approval from our inspectors to close up the walls in Phase II of our Fairmount whole-home renovation project (see the finished kitchen here and the restored cupola here). In this phase we are renovating all of the 3rd floor with a new walls, a new rear dormer that is adding a high ceiling and a door to a future rear deck. This Phase II work includes not only the 3rd floor renovation but also roofing the main roofs, new gutters & downspouts, a new HVAC system, some finishing trim and hardware work in other areas of the house.

Here, you see the exterior walls and ceiling have been sprayed with closed cell sprayfoam insulation – our go-to insulation. It is more effective than fiberglass batts and we are able to meet and exceed the energy requirements within a shallower thickness of wall and this keeps more floor space for our clients while making their older homes more comfortable. After spray foam, the drywall and mud team follow and really bring the newly reframed space into form. Seeing the walls, the doors, and closets take shape will be really exciting and allow us to set up for the next stages of finish work that include the finish floors, trim, doors, window, and all the fun finishes.

With the holidays just around the corner, we’re starting to book our large 2016 spring projects. Call us today for help with creating a new life for any space in your home.

A Day in the Life of a Kitchen Remodel — Step 10: Final Installations

1309241121_

The early part of this week is being spent confirming details on our Mt. Airy kitchen and ensuring that subcontractors arrive on time, in the proper order, and finish on schedule. The flooring will go in on Wednesday, the stone on Thursday, and the wall and tall cabinets on Friday.

Timing is everything at this point. The kitchen counters need to go in before the wall and tall cabinets because some of these cabinets actually sit on the countertops. Likewise, the stone can’t go in until the floor is complete because a couple of base cabinets had to be removed to get the floor in. This equates to a lot of juggling and communication between multiple parties — one of the key reasons why it’s important to have an experienced general contractor handling a complicated job like this. Sometimes, there are crazy little loose ends that come up. In fact, there was a sink installation detail to clarify just this morning. So we are in touch with the customers about that even though they are out of town.

This is the real crunch time in the project. Once we get these last big strokes done, it’s all paint and trim and fun stuff from here. Follow along on our facebook page for pictures of the final stages of this kitchen!


Revisit previous updates on this project:

Step 1: Planning
Step 2: Demolition
Step 3: Insulation and Framing
Step 4: Prepping for Inspection
Step 5: Pre-Closing
Step 6: Drywall
Step 7: Cabinetry
Step 8: Cabinetry Pre-Installation
Step 9: Cabinetry Completion, Countertop and Flooring Prep

A Day in the Life of a Kitchen Remodel — Step 4: Prepping for Inspection

2013-07-05 12.46.33_540x260_

There are many things happening this week in our Mt. Airy kitchen remodel as we prepare for inspection. This will require a lot of coordinating between the clients, all of our vendors, the design team, and the production team. We will all have to keep our “eyes on the ball.” Here is a snapshot of our plans for the week ahead:
Completion of mechanical and electrical rough-ins scheduling of inspection
Finishing the exterior holes for the new oven vent completion of final framing work
On-site measurements for the custom cabinetry
Finalization of customer selections and placing final order items
Once we are inspected and approved to close, we’ll finish the insulation and then move on to drywall. Be sure to visit our facebook page for regular updates and photos on this project.

Revisit previous updates on this project:

Step 1: Planning

Step 2: Demolition

Step 3: Insulation and Framing

How Long Will My Renovation Take?

replica watches

While it is difficult to discuss how long a remodeling project will take without being specific about the type and scope of room being done, generally speaking, most of our projects take between two and five months from start to finish, with the average being three and a half months. We manage a number of complicated, inter-related phases of work during a project. Here’s how it breaks down:

Design — Whether you are considering a kitchen, bathroom, outside space, addition, or redesigned interior space, you can expect the design phase to last 2-8 weeks, depending on the complexity of the project. Our design team will conduct a complete site survey and meet frequently with you to learn what you want from the project, your aesthetic sensibility, and your budget. With this input, the design team will prepare and revise schematic drawings and elevations, accompany you on supplier visits, and otherwise define and refine what the project will involve. The faster you make decisions, the faster this section of the work progresses.

Contract Signing — The time it takes for this is dependent upon you as a homeowner. Once a Project Construction Agreement (PCA) is signed, we schedule the work as soon as possible. FYI: You can speed this process along by signing during traditionally slow production seasons, such as late summer or the winter holidays.

Project Setup — It takes a couple of days to a couple of weeks to complete permit applications, final selections, final drawings, and project site set up. And it is the best way to get the high-end replica watches.

Demolition — It will take a couple of days or more for our crew to work on-site within RRP/EPA lead safety guidelines to remove pre-existing items from the space, including old tile, appliances, flooring, drywall, and cabinetry using a large truck or dumpster.

Rough Framing — Installing new walls, floors, and roof structure can take anywhere from a couple of days to a couple of weeks, depending on the size of the project.

Rough-Ins — During this stage, all new mechanicals, wiring, plumbing, and HVAC are installed. On most projects, only one subcontractor can work at a time on these tasks, so this can take a few days to a couple of weeks.

Inspections — Once all of the subs are done, the building inspector can come through and approve the project to be closed in. We allow a couple of days for this step, keeping in mind that some townships are faster than others.

Close In — We then spend anywhere from a couple of days to a couple of weeks installing the drywall, plaster, cement board, subflooring, and hardwood flooring.

Finishes — On our projects, this is typically a large project section with many moving parts. Tile, paint, and other types of flooring all have to be installed in the proper sequence in order to protect them from damage, and this process can take several weeks.

Trim-Outs & Trim Carpentry — Next, cabinetry and trim are installed, followed by electrical switch plate covers, HVAC covers, and specialty items that will be mounted to the newly finished walls. This can take anywhere from a day to several weeks.

Substantial Functionality — Once the room is able to be used for its intended purpose, it is termed “substantially functional.” This marks the start of your one-year warranty period.

Punch Out — The lead carpenter has a final meeting with you to sign off on any remaining issues that need to be resolved. After they are, your project is complete.

Have additional remodeling questions you need answered? Please don’t hesitate to ask. We’d love to hear from you.

Image: Mark Gisi/Tabula Creative

Video Clip: Tamara Myers Interview

Tamara, who serves as Chair of the Membership Committee for the DelChester chapter of NARI, recently sat down with NARI’s Morgan Zenner at the National NARI 2012 CotY judging to discuss Myers Constructs, and the role NARI membership and certification plays within the company.

Watch it here.

Project Slideshow: Center City Kitchen Upgrade

With their five children grown and leaving the nest, our clients in this Center City rowhome are preparing for the next stage of their lives — and those plans include a brand new kitchen to replace the 30-year-old builder grade space they had been using. The clients wanted newer, more savvy appliances and fixtures, as well as a room that would accommodate their changing lifestyle, which includes entertaining their grown children and extended families. Even though the footprint of the kitchen was on the smaller side, they needed to max out its performance!

After removing everything from the old kitchen, we ran all new wiring and vented the oven hood exhaust to the outside (something the original builder had failed to do). We then installed Euro-styled flat-panel cabinets in a dark wood stain, along with new Bosch appliances that the homeowners had selected. We replaced the old kitchen floor with a comfortable cork product and added a wine and book storage area next to the kitchen in the dining area. Glass backsplash tile edged with chrome and polished chrome hardware on the cabinets provided a little “bling” for the finished space.

Updated Project Slideshow: East Falls Kitchen Renovation

This home is a lovely, large 1920s stone single in East Falls. The homeowners, who are now “empty nesters,” asked us to renovate their large kitchen, laundry, and breakfast areas at the rear of the house. They felt that these rooms, last remodeled in the late 1970s, were very cold and poorly designed and fitted. In talking to the clients, we learned that they planned to live in this home for many more years before considering selling. We also discovered that they often entertain their children and grandchildren, so it was important to have room for everyone, even though moving walls would not be possible. The couple wanted traditionally styled, long-lasting, high-quality materials in their new spaces.

Our designers’ first step was reorganizing the layout inside the existing walls for maximum comfort and use and reconfiguring the spaces for better circulation. They selected cabinetry that better fit the minimal, but large-scale features in the home, which still contains many of the original modest Quaker-inspired trims and details.

We next installed hard-wearing Marmoleum tile with under-floor heating to warm up the spaces, as well as high-end Thermador appliances and added lovely finishing touches like shiny silver pendant lighting and subway-style backsplash tiles.

View the slide show here.